Spoonful of Imagination

Add it to a Family for Something Beautiful

  • Home
  • Our Family
    • Our Home
  • Courses
  • Shop
  • Contact

Bohemian Style Wood Wind Chime

September 24, 2014 By Erica Deuel 3 Comments

DIY_feather_wind_chimeAre you drawn to nature?

The air is finally getting a bit crisper in Georgia. I find myself sitting on the steps out front, while the kids ride bikes, and not melting. Its lovely.

Even my dogs are acting like pups and frolicking in the yard. There is something about the fall. There is a freshness and a feeling of change that excites us. I can’t be outside all day everyday, so I try to bring the outside in my home, whenever I can.

I love the simplicity of this project. Its natural elements look beautiful and speak for themselves. Here’s how you can make your own wood wind chime.

craft with feathersI started with tying some basic string around a stick I found on one of our hikes. We try hike at least once a week. I think it does all us good to get out in nature, unplug, and exercise.

rope_on_a_stickI turned the knot of my string to the back side of my stick. I cut it the length I wanted pushed on a pretty wood bead, and then hot glued a feather to the end of the string. Once the feather hot glue was set, I added a little more glue to the feather’s quill and pushed the bead on top. Quills kind of gross me out, so the bead helps cover that up.

craft_with_feathers

wood_bead_craftI’m sure you could change the order of these two steps and tie the string on last. Do which ever is easiest for you!

I ended up tying several string together to measure the length and then did the feather and bead step to all of them at the same time. You will find a groove that works for you. It’s not difficult at all, just tedious picking up the wood, and straightening out the strings every time to measure length and order the color/size of the feathers.

bohemian_craftI did one long row feathers, and I then went back and added a shorter row. I love the layered look, but also the simplicity that they are spread out and not overly packed in.

feathers_and_beadsOnce I had all my string tied on, I added a little drop of hot glue to the knot on back. I wanted them to stay in one place and not shift up and down the stick or for the knots to turn to the front.

feather_windchimeAfter the glue dried, I nailed two small nails into my wall and set my new wood wind chime or rather wall art on top. I love it, although I do struggle with what it is called?! What do you think?

bohemian_decor_craft

DIY_bohemian_craftI am so thankful that even though we are trying to sell our house, my sweet husband still lets me put nails in the walls. He said, it’s still our house, so I will treat it as so! I love how this natural simple wall art compliments my crazy, fun patterns and colors in my room so well.

bohemian_colorful_bedroomWhat do you think of color mixed with natural elements? Does that combo make your heart smile too?

The more important question, do feather quills gross you out also!? I would love to see, if you make one of these! Have fun! Remember each one will most likely be different, and that is beautiful!

Thanks so much for stopping by!

signature

Share this:

  • Click to email a link to a friend (Opens in new window)
  • Click to share on Facebook (Opens in new window)
  • Click to share on Twitter (Opens in new window)
  • Click to share on Pinterest (Opens in new window)

Craft Supplies

March 15, 2013 By Erica Deuel 4 Comments

20 top DIY craft suppliesIf you aren’t a DIY crafter, it can be really overwhelming to walk into a craft store like Hobby Lobby, Jo Annes, or Michaels.  There are so many different products and all classified in aisles with similar type items.  I assume you stand there looking at it all and wonder which do you choose and where do you start.

Today, I want to give you a list of my favorite craft items.  These items (other than the ones that don’t need replacing like scissors and ruler) I am regularly buying, even if I don’t have a project in mind.  They are the items that I use ALL the time for a wide range of projects.  I feel like if you have these items you can jump start DIY projects and decorating your home for much less.  Below I have listed 20 items and given examples of ways/projects I use these craft items.

Read the list, print it out, and go shopping!

1. Clear Sewing Ruler

My favorite ruler is 3″ x 18″. I use it to measure everything-not just sewing projects! I love to use it on paper crafts as well because you can align patterns better with the see through style. Example of use: making cards and centering applique items on fabric

clear sewing ruler

2. Mod podge

I think Mod Podge can make any project look more “finished” and “professional.” There are lots of different finishes, but the gloss and matte are my two favorites. Example of use: finishing off any ceramic paint job, collages, or appliqueing pictures/papers to other objects

modpodge

3. Sharpies

I use sharpies everyday. There are lots of different sizes and colors. Having a multi pack is a great thing to have on hand. Example of use: making cards, organization, banners, decorating jars/signs

sharpies

4. Exacto Knife

Having an exacto knife on hand is so helpful. It can be used to cut all those small or intricate things that scissors can’t do really good. Example of use: create your own stencil

SONY DSC

5. Burlap/Burlap Ribbon

Burlap is so fun and cheap! You can buy it by the yard, or (in the flower section at Hobby Lobby) they sell it in a variety of different ribbons to make it more manageable to create with. I have both on hand and use them all the time. Example of use: create a table runner, decorate jars, make a banner, wreaths, and embellish pillows

burlap_ribbon

6. Brown packaging paper by the roll

I buy mine for a $1.00 at the Dollar Tree in the office supply section. It makes great wrapping paper, but I end up using it a lot on other projects as well. Example of use: table runners, banners, stuffing for filler items, cards, wall art, or a drop clothe for other projects

brown-wrapping-paper-8-meter-roll

7. Paint brushes

Having paint brushes in a variety of different sizes is so helpful! I also like to have a variety of types as well. I have a Dollar Tree ones that I use on quick, one time projects like staining a sign. I also have nicer fine brushes that help me paint small things like letters. Example of use: painting signs, using mod podge, or decorating anything

775paintbrushes

8. Acrylic paint

I have a whole basket of different colors of small acrylic paint bottles for like $0.49 each. I like the Americana brand at Hobby Lobby. Example of use: creating a sign, painting seasonal items, embellishing items, or organization

art-deco-paint

9. Scrapbook paper

I buy the brown paper package at Hobby Lobby and use it for everything! I also love to have lots of fun sheets and patterns on hand. I use to scrapbook, but now I use all my scrapbook paper for different projects! Example of use: cards, background for frames/wall art, banners, and embellishing

scrapbook paper

10. Packages of fun/vintage buttons

There are so many fun uses for buttons and you can never have too many! Example of use: hair bows, wreaths, pillows, wall art, necklaces, and embellishing

buttons

11. Cute glass jars to store craft supplies in

I love to store my beads and other small craft stuff in pretty jars, so I can easily see my supplies and also enjoy their fun bright colors. Example of use: storage, organization, vases, gift to give flowers

glass-jars-with-lids

12. Sheets of felt

They sell pieces of felt for $0.25 each at Hobby Lobby. I use felt on a lot of different projects. Example of use: hair bows, embroider hoops, sewing projects, wreaths, and embellishing

sheets of felt

13. Embroidery floss with needles

They are like $.19 each and I always use it for something! Example of use: wall art, embroider hoops, hair bows, monogramming, sewing projects, and embellishing

embroidery floss

14. Jute rope

Jute Rope is a staple. I use it on everything from wrapping presents to making banners & tags. Example of use: decorate jars, banners, gift tags, cards, wreaths, and wall art

jute rope

15. Small sewing scissors

Good scissors are so important, but also there are so many projects (even paper ones) where I need a small point to cut something out and need a small sharp needle. Small thread scissors can be perfect for this OR in the BEAUTY section at Target the eyebrow trimmer scissors are really good too. Example of use: creating stencils, cards, hair bows, paper wall art, and sewing projects

eyebrow scissor

16. Stencils

Stencils are great to have on hand. If you don’t want to buy one, you can make one like I showed you on a personalized sign I made for my sister. I think having a nice font with all the letters of the alphabet is a great place to start. Example of use: signs, cards, organization, and embellishing

stencil-alphabet

17. Fun tape or ribbon

I recently bought some fun patterned duct tape in the Target dollar section at the front of the store, and I know I will be using it on something other than a normal duct tape use. Example of use: wall art, wreaths, hair bows, embellishing

ribbonspools

18. Little Things

I love little things like knobs, scrap book pieces, feathers. I use them all the time in random projects. Example of use: signs, hair bows, wreaths, and signs

craft feathers

19.  Hot glue gun

A hot glue gun is a staple in the craft room. I have two guns. I have a fine tip hot glue gun that I use to make hair bows, but I also have one that has a wider end that is helpful to use on bigger projects. Example of use: ANYTHING!  I just used it to make a rug 🙂

Hot-Glue-Gun

20.  Natural elements

Here is where I might sound weird. I have zip locks of natural elements that I love to use in decorating or other craft projects. Examples:  acorns, pine cones, bark, hay, and rocks. Example of use: filler to lanterns/jars, mantle decor, banners, signs, and wreaths

pinecones

Spring is such a wonderful time to de clutter and get motivated to start new things.  I hope this craft list can help encourage you to try a DIY project if you don’t already craft. If you are ALREADY a crafter, did any of these items surprise you from me?  I think the BEAUTY supply item (eyebrow trimmer scissors) is such a valuable tool!  What is your favorite craft item?

signature

Share this:

  • Click to email a link to a friend (Opens in new window)
  • Click to share on Facebook (Opens in new window)
  • Click to share on Twitter (Opens in new window)
  • Click to share on Pinterest (Opens in new window)

DIY Burlap Hair Bow

January 30, 2013 By Erica Deuel 11 Comments

vintage burlap hair bows

Do you have a baby shower or girl’s birthday coming up and you’d love to show up with a really special and unique gift?

My friend Erin and I are throwing a small craft/girls night/baby shower for one of our mutual friends next Tuesday night, and it has me making hair bows for the first time in what feels like forever.  I am loving it.  Hair bows can be such a quick craft that make a wonderful gift for babies and really girls of all ages. (including trendy mamas of course!)

The burlap trend is big right now and one of my personal favorites. Today I’m going to walk you through some DIY burlap hair bows.

I love how even after you “master” making one style, you can do small changes to make several of those hair bows all different from one another. For example, these burlap hair bows are all made with the same method, but the finishing elements gives each one a different look.

vintage hair bow

Materials:

  • Burlap (cut into strips about 1″ wide)
  • Craft feathers
  • Buttons, beads, parts of old necklaces
  • scrap fabric pieces like chiffon and tulle
  • felt (cut into about a 2.5″ across square
  • Hot glue gun with glue sticks

hair bow materials

The felt squares will help save your fingers from being burned by the hot glue as it acts as like a canvas to hold your hair bow.

You begin with one felt square and a piece of burlap.  Add a little hot glue to the outside edge of your circle and stick the end of one of your burlap strips on it and press it tight together.  Give it a few second to “set”.  Depending on how far down you start gluing your burlap on your felt square and how wide your burlap and felts circles are, will determine the actual finished size of your hair bow.  Mine are all a little over 3″ across.

Next, add a little glue on top of your burlap in about the same spot you glued the burlap to the felt.

burlap projects1

Fold your burlap slightly over and press it for a few seconds into that hot glue glob so it “sets”.  This will step will start to create a slightly ruffled look.

burlap projects

Once it has “set, you add another glob of glue on the end of that ruffle.

hot glue project

Slightly fold over your burlap strip again and “press” it for a few second to “set.”

gluing burlap

You keep doing this step all around your piece of felt.  There is no need to fully make sure each “fold over” is glued more than to just the top of the fold in line in front of it.  The ridges in the burlap allow the hot glue to seep through and some of it catches onto the bottom felt.  That is good enough for now.  I will show you when to add more glue to make sure the burlap ruffles are tightly attached to the felt circle in a minute.

Once you are back at the beginning of your felt circle, you cut off the extra burlap.

making burlap hair bow

You now have the rough base of your hair bow.

I like to add feathers here to start the embellishing fun stuff.  Lift up the edge of your burlap.  There should be a flap of felt left open to attach your embellishments.  Add a glob of glue on the felt and stick a feather (or a few) into the glue.

glueing burlap and feathers

Press it for several seconds. At this point, you might realize that during this “pressing” part of hot gluing the burlap, you fingers can get burned.  ouch. I’ve been doing this for years and have just kinda gotten used to it. Silly, I know! You could certainly find some good gloves at Home Depot to avoid the burns.

hot gluing burlap

Now, after the feathers had set, I went back and added more glue under the edge of my burlap ruffles onto the felt to make sure they were good and sealed on the felt.  I don’t want my hair bow to fall apart, so I am OCD with my glue.

I wanted to add more texture and depth to my hair bow, so I actually cut one of my 1″ strips in half and did the same ruffle steps on top of my current burlap ruffles to add another layer of ruffles for this hair bow.  On the other hair bows (in the top picture), I also did this step with the 1″ burlap strips.  It is up to you if you add this extra layer or and you can choose how wide you would like them to be.  The important part is to just make sure you glue the initial edge of burlap onto the center of your hair bow.

cutting burlap

I then hot glued an alligator clip onto the back of my hair bow (that I had covered with ribbon). This gives the clip a strong bond to the bow while staying in your hair or attach to a headband.

back of hair bows

Since my burlap hair bow is thick with hot glue, I opted to glue my button into the center on the top (rather than try to sew it through all those layers of hot glue).  And with that, the burlap hair bow is done!DIY burlap hairbow

I am giving this one to my friend at her baby shower.  I can never make just one though. So, now I have a bunch ready for my next sale.

If you follow me on instagram or twitter, you get quick previews of things I am working on during the week.  You may have seen some of the other types of hair bows I made this week on those two sites.

Wanna see some suggestions for variations on your bows? I did slight changes to each one to make the hair bow look unique and kept me feeling creative rather than like a machine making the same thing over and over.

burlap flowers

I can not promise that injury to your fingers will not happen when using a hot glue gun for this long. (Again, gloves. It’s not like they hand out badges for being a tough crafter!)

hot glue gun burn

My fingers are a little sore today.  What we do to get our crafting on!  I love it. (but seriously, gloves.)

When I make this many hair bows at once, I have a little pile of small ribbon, fabric, buttons, scrap-book embellishments, and other odds and ends next to me.  I simply start playing and adding something here and there.  Usually adding one element (like a shiny black button) will make that hair bow seem fancier, so I add other things to keep it fancy (like black feathers).  If I add a duller wood type bead, that hair bow takes on a more vintage, rustic persona and I keep to that feel by adding duller ribbon and funnier feathers (like burnt orange) as well.

DIY hairbows

My little girl has not been feeling well this week, so this is the best model shot I could get out of her.  You can see the hair bow size and how we like to wear it on the side.

sick little girl

I absolutely love how each hair bow can be different, if we just add a little imagination to the base format.  I hope you will feel like hair bows can be simple and that you can make one now and use some of that scrap burlap from your other projects.

vintage love


Thank you so much for stopping by! Let’s get the link party started!  Have you made a kid related craft this week too?  I would love to check out your All About the Kids post.  Please link them up!      signature          


Link up at Mod Vintage Life

Share this:

  • Click to email a link to a friend (Opens in new window)
  • Click to share on Facebook (Opens in new window)
  • Click to share on Twitter (Opens in new window)
  • Click to share on Pinterest (Opens in new window)

DIY Feather Wreath

November 30, 2012 By Erica Deuel 4 Comments

I am so excited to share today’s Project Spotlight with you!  A few weeks ago, I fell in love with a white feather wreath at Target.  I stood there staring at it, trying to decide if I should buy it.  It cost $19.99, and I decided to pass it by and try to make it myself.

Today I am going to show you the technique I came up with to make this DIY feather wreath, and it only cost about $4.00 to make!  That is less than 1/4 the price at Target, and it really was so easy!

Here is what you will need to buy: one styrofoam wreath and white craft feathers.  I already had my hot glue gun with glue sticks, but if you do not have those items, you will have to buy them as well.  I got my foam wreath (normally $4.47) at Hobby Lobby with a 40% off coupon.  I also got my white craft feathers there, and they were 30% off this week.  So, the normal $1.99 a package of white craft feathers cost me about $1.30 each.  I completely used both packs.

I started by adding a big drop of hot glue to my wreath.

I added a feather and pressed my thumb on the spine of the feather to prevent getting burned.  I just want to briefly say here, I am so sorry for my messed up/old finger nail polish in all these pictures.  How embarrassing. 🙂 

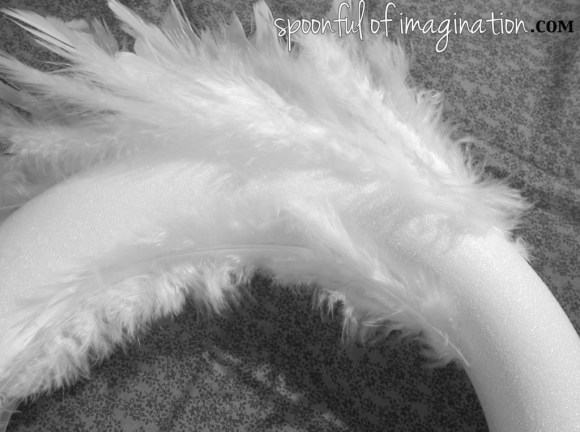
I went about five or six feathers across the styrofoam of the wreath.

Those feathers were my first row.  I then started my next row about an inch lower on the styrofoam.  This allowed for lots of overlap but spread the feathers out a little, so I didn’t need as many.

I found that the five or six feathers across allowed for some “wrapping” on the sides of the wreath.  They started to go towards the back but also the back still had a bare streak, so as not to waste feathers that would not be seen.  Play with the amount of feathers you need.  Depending on the size of your ring of styrofoam and feathers you may need more or less.  The important part is to just cover the sides well because you don’t want any styrofoam to be seen at any angle your wreath ends up being displayed and seen.

You then just keep adding rows and rows of feathers doing the same steps until you are about to where you started.

From there you do your best holding/bending the first row of feathers back so you can stick glue in there behind them and glue those final rows.  It was a bit tricky managing it on my own, but it can be done!

After you get those last rows done, you are done!  You have just created a professional looking wreath for less than 1/4 the price!

I love it!!  I think it looks Christmasy yet also wintery.  Even after the rest of your Christmas decorations come down, this pretty wreath could stay up till the spring!

I think these wreaths would make amazing Christmas gifts for friends or family.  I think they would also make fun hostess gifts or a nice wedding/house-warming present.  The ideas are endless, and they are gorgeous and CHEAP!

I stuck my wreath up on my mantle with a little star I found at the Dollar Tree last week.  Today we are getting all of our Christmas decorations down out of the attic and I can’t wait to really deck my halls with this beauty!  I’m sure I will be back to show you my results!

Have you started decorating for Christmas?  Can you see yourself making this wreath?  Thanks so much for stopping by and I hope you have a wonderful weekend!


Linked up at: DIY Show Off, The C.R.A.F.T. Blog, Little Inspiration, Homeschool Creations, and Shaken Together


Share this:

  • Click to email a link to a friend (Opens in new window)
  • Click to share on Facebook (Opens in new window)
  • Click to share on Twitter (Opens in new window)
  • Click to share on Pinterest (Opens in new window)
  • Email
  • Facebook
  • Instagram
  • Pinterest
  • YouTube
YouTube-Channel
Erica Deuel

Subscribe for Weekly Updates!


Most Popular Posts

Painting Flower Pot Party Tips
DIY {easy} Burlap Wreath
DIY Paper Butterflies- Spring decor for cheap
DIY Outdoor Checker Board
Chiffon Flower Tutorial
Cheap lamp to Industrial Beauty
DIY Outdoor Table
Repurpose Old Kitchen Chairs
Paint That Captures the Magic and Inspiration of Disney
The Way I Thrift

Categories

  • All About the Kids
  • art journal
  • Blogging
  • Christmas
  • Craft Projects
  • Dancing Zebras
  • DIY
  • Eddy's postcards
  • Embroidery Journal
  • Family
  • Featured
  • Fireside Chat
  • Foster Care
  • Giveaways
  • Guest Posts
  • Home
  • Homeschooling
  • Kid Activities
  • Kid Craft
  • My Heart
  • Our Outings
  • Project Spotlight
  • Send Out Love
  • Shop
  • Sponsored Posts
  • Spoonful Lab
  • Spoonful Tribe
  • Tips + Tricks
  • Traveling
  • Uncategorized
  • Vlog

Favorite Categories

Subscribe for Weekly Updates!

Favorite Categories

© 2023 Spoonful of Imagination, Inc.