Spoonful of Imagination

Add it to a Family for Something Beautiful

  • Home
  • Our Family
    • Our Home
  • Courses
  • Shop
  • Contact

DIY Embellished Chritsmas Stockings

November 24, 2014 By Erica Deuel Leave a Comment

emebellished_stockingWe have never had matching stockings for Christmas. We sort of just added on new stockings each time our family grew. Some are felt but they all are crazy different colors as you can see in this post.

As I thought about making new stockings verse buying, I landed on a mix of both. I would buy the stockings and then embellish. I found these pretty sweater type stockings for $12 each. I love the two different colors. The mix of a pop of color with a neutral was perfect for my embellishing idea. Follow along and I’ll show you how simple it is to have your own embellished Christmas stockings.

red_sweater_stockingI could have had them monogrammed but embroidering is much more my look. After sewing my yarn arrow pillow, I knew I wanted to use that style and technique for our names. My husband’s name is the shortest, so his stocking was my guinea pig. I love how it came out and rather than finishing the whole family I decided to share this one with you. So hurry, run and grab your supplies and we can embroidery “together”. I have four more stockings to go!

I picked a bold color, navy blue, to start his name.

DIY_emebellished_stocking

DIY_personalized_stockingI then outlined his name with different colors for an added pop. I think I will do every name a little different in font, style, spacing, and design. Having the same stocking and using the same color thread will give the set a uniform look, but still having some uniqueness in the names.

yarn_embroidery

personalized_stockingI love that by adding a little bit of imagination to an already made stocking I can just embellish and add my touch without having to spend the time creating the actual stocking. What do you think!?

Does your family have matching stockings?

DIY_yarn_embroideryI’m hoping these stockings are the ones that my kids grow up and have childhood memories remembering. I love having a project I can work on as we continue to transition to living in the north!

Hope you all have a blessed week!


signature

Share this:

  • Click to email a link to a friend (Opens in new window)
  • Click to share on Facebook (Opens in new window)
  • Click to share on Twitter (Opens in new window)
  • Click to share on Pinterest (Opens in new window)

Georgia on My Mind and on My Pillow

August 4, 2014 By Erica Deuel 3 Comments

Georgia_pillowSometimes in life we have time to process and prepare for change. There are other moments in life where we don’t, and we can feel robbed or cheated. I am continually thankful that we had time to process, prepare, cry and cherish our last days with our sweet foster son. We are still largely processing all that we experienced and what God wants for us, but one thing I am continually so grateful for is God’s faithfulness.

One of my outlets for processing change and all that life throws my way is crafting. This past weekend, with a million things on my to-do list, I snuck away to my sewing machine for an hour and created this embellished pillow. What can I say, it’s like therapy. While I process life, all that’s going on, and all the things ahead I’m thinking a lot about my roots, where I’m from, and all those special people who have invested in me along the way. So naturally being a good Southern girl, I have Georgia on my mind, and now I have it on my pillow too!

Follow along and you too can make a state pride piece for your home.

oh, happy dayI started with a plain dark grey, simple pillow case. I have had this one for sometime, but it didn’t look right in my home without a little jazz. So I decided to add my state outline to it. It is no secret that embellishing an already existing item can make a very easy craft. It can often times make your project cheaper. Just like my felt heart pillow, this state pillow will turn a dull boring pillow into a fun statement piece.

I Googled “GA outline” and printed my favorite one, pinned it to my fabric, and cut the paper and fabric at the same time to give me a Georgia fabric silhouette. You could repeat this process with any state or country that is special to you.

GA_outlineI then pinned that fabric silhouette to a piece of burlap and cut about 1/4″ off the fabric silhouette to give the state a burlap border.

GA_FabricI then used some scrap felt to cut out a heart. I placed this where our capital would be on a map. We live in a northern suburb of Atlanta, so it only seemed appropriate to make sure it is represented on the state. I embroidered the heart in place and then sewed the whole piece onto my existing pillowcase.

Atlanta_Georgia

felt_heart

GA_pilllowI love how it turned out! It added a punch of personality and fun to a rather boring pillow.

Georgia_gift

embellished_pillow
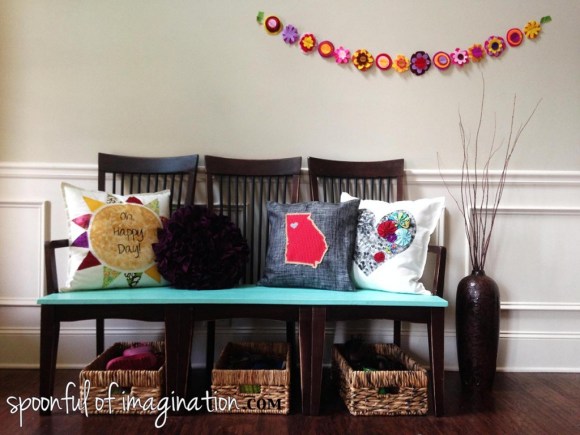
You could use this idea for any state, shape, or symbol! My bench is like a rotating canvas to hold my pillow obsession.

Are you an inward processor too? What activity helps you process?? I’m always up for new things. I wish I could journal, but then again maybe this is my journal.

I hope you all are having a good week! Find a way to use your imagination and dream big dreams with me!

signature

Share this:

  • Click to email a link to a friend (Opens in new window)
  • Click to share on Facebook (Opens in new window)
  • Click to share on Twitter (Opens in new window)
  • Click to share on Pinterest (Opens in new window)

DIY Burlap Hair Bow

January 30, 2013 By Erica Deuel 11 Comments

vintage burlap hair bows

Do you have a baby shower or girl’s birthday coming up and you’d love to show up with a really special and unique gift?

My friend Erin and I are throwing a small craft/girls night/baby shower for one of our mutual friends next Tuesday night, and it has me making hair bows for the first time in what feels like forever.  I am loving it.  Hair bows can be such a quick craft that make a wonderful gift for babies and really girls of all ages. (including trendy mamas of course!)

The burlap trend is big right now and one of my personal favorites. Today I’m going to walk you through some DIY burlap hair bows.

I love how even after you “master” making one style, you can do small changes to make several of those hair bows all different from one another. For example, these burlap hair bows are all made with the same method, but the finishing elements gives each one a different look.

vintage hair bow

Materials:

  • Burlap (cut into strips about 1″ wide)
  • Craft feathers
  • Buttons, beads, parts of old necklaces
  • scrap fabric pieces like chiffon and tulle
  • felt (cut into about a 2.5″ across square
  • Hot glue gun with glue sticks

hair bow materials

The felt squares will help save your fingers from being burned by the hot glue as it acts as like a canvas to hold your hair bow.

You begin with one felt square and a piece of burlap.  Add a little hot glue to the outside edge of your circle and stick the end of one of your burlap strips on it and press it tight together.  Give it a few second to “set”.  Depending on how far down you start gluing your burlap on your felt square and how wide your burlap and felts circles are, will determine the actual finished size of your hair bow.  Mine are all a little over 3″ across.

Next, add a little glue on top of your burlap in about the same spot you glued the burlap to the felt.

burlap projects1

Fold your burlap slightly over and press it for a few seconds into that hot glue glob so it “sets”.  This will step will start to create a slightly ruffled look.

burlap projects

Once it has “set, you add another glob of glue on the end of that ruffle.

hot glue project

Slightly fold over your burlap strip again and “press” it for a few second to “set.”

gluing burlap

You keep doing this step all around your piece of felt.  There is no need to fully make sure each “fold over” is glued more than to just the top of the fold in line in front of it.  The ridges in the burlap allow the hot glue to seep through and some of it catches onto the bottom felt.  That is good enough for now.  I will show you when to add more glue to make sure the burlap ruffles are tightly attached to the felt circle in a minute.

Once you are back at the beginning of your felt circle, you cut off the extra burlap.

making burlap hair bow

You now have the rough base of your hair bow.

I like to add feathers here to start the embellishing fun stuff.  Lift up the edge of your burlap.  There should be a flap of felt left open to attach your embellishments.  Add a glob of glue on the felt and stick a feather (or a few) into the glue.

glueing burlap and feathers

Press it for several seconds. At this point, you might realize that during this “pressing” part of hot gluing the burlap, you fingers can get burned.  ouch. I’ve been doing this for years and have just kinda gotten used to it. Silly, I know! You could certainly find some good gloves at Home Depot to avoid the burns.

hot gluing burlap

Now, after the feathers had set, I went back and added more glue under the edge of my burlap ruffles onto the felt to make sure they were good and sealed on the felt.  I don’t want my hair bow to fall apart, so I am OCD with my glue.

I wanted to add more texture and depth to my hair bow, so I actually cut one of my 1″ strips in half and did the same ruffle steps on top of my current burlap ruffles to add another layer of ruffles for this hair bow.  On the other hair bows (in the top picture), I also did this step with the 1″ burlap strips.  It is up to you if you add this extra layer or and you can choose how wide you would like them to be.  The important part is to just make sure you glue the initial edge of burlap onto the center of your hair bow.

cutting burlap

I then hot glued an alligator clip onto the back of my hair bow (that I had covered with ribbon). This gives the clip a strong bond to the bow while staying in your hair or attach to a headband.

back of hair bows

Since my burlap hair bow is thick with hot glue, I opted to glue my button into the center on the top (rather than try to sew it through all those layers of hot glue).  And with that, the burlap hair bow is done!DIY burlap hairbow

I am giving this one to my friend at her baby shower.  I can never make just one though. So, now I have a bunch ready for my next sale.

If you follow me on instagram or twitter, you get quick previews of things I am working on during the week.  You may have seen some of the other types of hair bows I made this week on those two sites.

Wanna see some suggestions for variations on your bows? I did slight changes to each one to make the hair bow look unique and kept me feeling creative rather than like a machine making the same thing over and over.

burlap flowers

I can not promise that injury to your fingers will not happen when using a hot glue gun for this long. (Again, gloves. It’s not like they hand out badges for being a tough crafter!)

hot glue gun burn

My fingers are a little sore today.  What we do to get our crafting on!  I love it. (but seriously, gloves.)

When I make this many hair bows at once, I have a little pile of small ribbon, fabric, buttons, scrap-book embellishments, and other odds and ends next to me.  I simply start playing and adding something here and there.  Usually adding one element (like a shiny black button) will make that hair bow seem fancier, so I add other things to keep it fancy (like black feathers).  If I add a duller wood type bead, that hair bow takes on a more vintage, rustic persona and I keep to that feel by adding duller ribbon and funnier feathers (like burnt orange) as well.

DIY hairbows

My little girl has not been feeling well this week, so this is the best model shot I could get out of her.  You can see the hair bow size and how we like to wear it on the side.

sick little girl

I absolutely love how each hair bow can be different, if we just add a little imagination to the base format.  I hope you will feel like hair bows can be simple and that you can make one now and use some of that scrap burlap from your other projects.

vintage love


Thank you so much for stopping by! Let’s get the link party started!  Have you made a kid related craft this week too?  I would love to check out your All About the Kids post.  Please link them up!      signature          


Link up at Mod Vintage Life

Share this:

  • Click to email a link to a friend (Opens in new window)
  • Click to share on Facebook (Opens in new window)
  • Click to share on Twitter (Opens in new window)
  • Click to share on Pinterest (Opens in new window)
  • Email
  • Facebook
  • Instagram
  • Pinterest
  • YouTube
YouTube-Channel
Erica Deuel

Subscribe for Weekly Updates!


Most Popular Posts

Painting Flower Pot Party Tips
DIY {easy} Burlap Wreath
School Desk Makeover
DIY Bookends (what you can make for being a hoarder)
Cheap lamp to Industrial Beauty
DIY Outdoor Checker Board
The Encanto, Madrigal's House Craft For Kids
DIY Paper Butterflies- Spring decor for cheap
Repurpose Old Kitchen Chairs
Repurposed Furniture Ideas

Categories

  • All About the Kids
  • art journal
  • Blogging
  • Christmas
  • Craft Projects
  • Dancing Zebras
  • DIY
  • Eddy's postcards
  • Embroidery Journal
  • Family
  • Featured
  • Fireside Chat
  • Foster Care
  • Giveaways
  • Guest Posts
  • Home
  • Homeschooling
  • Kid Activities
  • Kid Craft
  • My Heart
  • Our Outings
  • Project Spotlight
  • Send Out Love
  • Shop
  • Sponsored Posts
  • Spoonful Lab
  • Spoonful Tribe
  • Tips + Tricks
  • Traveling
  • Uncategorized
  • Vlog

Favorite Categories

Subscribe for Weekly Updates!

Favorite Categories

© 2023 Spoonful of Imagination, Inc.