Spoonful of Imagination

Add it to a Family for Something Beautiful

  • Home
  • Our Family
    • Our Home
  • Courses
  • Shop
  • Contact

Easiest Sewn Apron Ever

October 28, 2013 By Erica Deuel 13 Comments

Thanksgiving and Christmas are coming really quickly. I have come up with the easiest sewn apron for you to create and wear at your holiday parties. You can use it as a gift or as a simple way to dress YOU up for the festive meal. I made mine for my Spoonful Lab for me and my cute helpers to wear, so there are lots of possibilities for these pretty things.

I think the aprons cost about $1.50 each and took around 10 minutes (other than waiting for the spray paint to dry) to create. I know you are wondering “how!?!” Let me quickly tell you.

DIY_ApronThe first thing I did was buy some cheap premade aprons. These go for $1.99 at Hobby Lobby. I got mine when they were 50% off. I know you can buy this same sort of thing at a lot of dollar stores and Home Depot as well. I also found them here for $2.99, where they can be shipped to your door step.

I found that for the price and cost of time-I could not beat starting with one of these cheap base aprons.

plain_aprons

The next thing I did was lay some thin, pretty lace down over my aprons. I made sure to have the lace pattern laid on straight and that my whole apron front was covered by it. I then used some of my pretty Rust-oleum spray paint and sprayed right over the lace. Note: Make sure you shake your spray paint can really good before starting to spray. Spray about 8 inches above the apron, and spray straight down. Do not spray at an angle or the paint will go under the lace and damage the effect.

spray_paint_over_laceAfter the spray paint dried, I simply picked up the lace, and I had a really pretty decorative pattern on my aprons. I then cut three-inch wide strips of fabric and sewed them on to the bottom of my apron in the same way I did my ruffled shower curtain. I left the strips of fabrics’ edge raw, so there could be fray with wear. That is all there is to it!

My aprons were finished! I think the results are stunning for what I spent making them. I think you could easily do these with either fall or Christmas colors to make a simple festive gift or item to wear at your party. I picture a bunch of cute little girls wearing these for a Christmas cookie decorating party. So fun! There are lots of possibilities. They definitely worked great for me to wear at my Spoonful Lab last weekend!

Easy_sewn_apronI hope you are having a great week! Thank you so much for stopping in to check out this easy DIY!

signature

Share this:

  • Click to email a link to a friend (Opens in new window)
  • Click to share on Facebook (Opens in new window)
  • Click to share on Twitter (Opens in new window)
  • Click to share on Pinterest (Opens in new window)

DIY Fabric Bunting

May 13, 2013 By Erica Deuel 7 Comments

how to make fabric bunting

When I was designing Reagan’s room, I knew I wanted to have some fun pops of color throughout it. I thought fabric bunting would be a fun way to do this without costing a lot of money or creating something to dominate. I want to quickly show you how I created it, so you can do it too. I believe the way I did it might be one of the easiest sewn ways.

Materials

  • Fabric
  • Pinking Shears
  • Jute Rope
  • Thread
  • Sewing Machine
  • Ruler
  • Pen

I first went and got a few fabrics that I loved and were colors that I was incorporating in her room. I got 1/3 a yard of each of the fabrics. You could easily get more (depending on the area you want your bunting to wrap) or just use a bunch of different scrap fabrics you have on hand.

picking out coordinating fabricsYou then decide how big you want each of your “triangles” to be. I didn’t want mine to be too large. I decided I wanted them to be about 5″x6″. I measured my fabric and cut out a bunch of rectangles this size.

measuring fabric to cutI have seen a lot of ways of creating bunting to have the fabric double-sided with a nice sewn edge. I didn’t want to spend that amount of time on this project. It would have been like making a ton of little pillows as each triangle would have been sewn inside out than flipped right side out and iron pressed to go flat. In my opinion, the difference in look is not worth the extra time spent to have something that gives the same effect. I simply used my pinking shears to cut my fabric. The pinking shears allow the raw unfinished edge to not fray as bad and created a nice added look in the mean time.

cut fabric squaresOnce all my rectangles were cut, I start cutting them into triangles. I simply folded each rectangle and used a pen to mark the center of that rectangle and then cut from that point to one of the opposite corners. As I went on, I even stopped measuring for the center but just eye-balled it. It doesn’t have to be perfect. No one will be able to tell if you are a few centimeters off.

cutting triangles out of fabric

One tip to consider when cutting your triangles: Take a minute to think about which way the “fat” end of your triangle would look best (depending on the print of your fabric). In the triangle cut above, I would have cut right across the pretty green flower if I have cut my triangle from the other end.

After all your fabric is cut, you are ready to sew your bunting together! I sewed my triangles onto a thick jute rope because I wanted a more rustic look. You could sew yours onto ribbon, yarn, or just about anything!

fabric banner suppliesIf you decide to use jute rope as well, make sure your fabric hangs over the rope edge just a little as you sew. The rope will want to roll and you don’t want to create “holes” in between where your rope and triangle meet (as shown below).

sewing on rope

hole in banner

Another tip is to pull your rope tight as you sew, so it does not turn around.

pull rope tightI knew I was going to wrap my bunting around clear outdoor lights to hang in my daughter’s room, so I left a bigger gap in between my triangles (for room to wrap around the bulb-ed wire and hide it a little bit). It depends on the look you are wanting to create how far apart you space your triangles as you sew them onto your rope/ribbon.

making fabric buntingOnce you have sewn all your triangles, you are done! It is easy to go back and add more on, if your bunting ends up to be shorter than you would like. My bunting was a little short and didn’t cover the electrical cord like I wanted, so I just made another small strip and sewed it on.

The final step is to hang up your bunting and enjoy it! I love the simple yet fun look it creates!

fabric bunting

DIY Fabric Bunting

For more pictures of Reagan’s room, please go visit her Minnie Mouse Bedroom Reveal! Thanks so much for stopping by, and I hope I just gave you a quick DIY that you want to do!

signature

Share this:

  • Click to email a link to a friend (Opens in new window)
  • Click to share on Facebook (Opens in new window)
  • Click to share on Twitter (Opens in new window)
  • Click to share on Pinterest (Opens in new window)

Handprint Santa

December 19, 2012 By Erica Deuel Leave a Comment

I love hand print art and capturing the cuteness of my kids’ hands being so little.  You might remember seeing my Thanksgiving turkey or how we stamped ornaments with their hands.  Today, I am showing you our handprint Santa Claus.

In the light of events from last Friday at Sandy Hook Elementary, these simple Santa Claus handprints have moved me more than just seeing a cute craft.  I can’t stop looking at these handprints and thinking how blessed I am.  I continue to pray for these families and that this event in our country’s history will mark us and change us past the initial shocks so we are forever changed.

Here is how we made our handprint Santas:

I helped my kids stamp their hands with white paint onto some brown craft paper.  I then let the boys cut out their handprints while I cut all the pieces of the hats and faces.   I then let them assemble their Santa as a puzzle.  I drew Reagan’s Santa’s mouth to show the boys how a mouth looks when it is talking, and they did the same to their Santa’s.

We then glued our Santas to a pretty piece of scrapbook paper and added some merry “Ho, Ho, Ho’s.”  This is a simple and easy craft that has all the kids’ favorites:  Paint, cutting, gluing, and acting out “ho, ho, ho.”

Thank you so much for checking out our handprint Santas!  I hope you are having a good week and not stressing out too much!  I know my to-do list is still a mile long, but I am choosing to sing Joy to the World and not letting the stress carry my emotions and thoughts all day everyday.

How are you doing this Holiday season??


Linked up at:  Miss Information

Share this:

  • Click to email a link to a friend (Opens in new window)
  • Click to share on Facebook (Opens in new window)
  • Click to share on Twitter (Opens in new window)
  • Click to share on Pinterest (Opens in new window)

DIY Rope Balls

December 14, 2012 By Erica Deuel 15 Comments


Today, I have an easy DIY rope ball craft for you.  I created these pretty rope balls from Dollar Tree supplies  At the end of this post, I will show you a simple change you can do to make the same type of ball have another use.

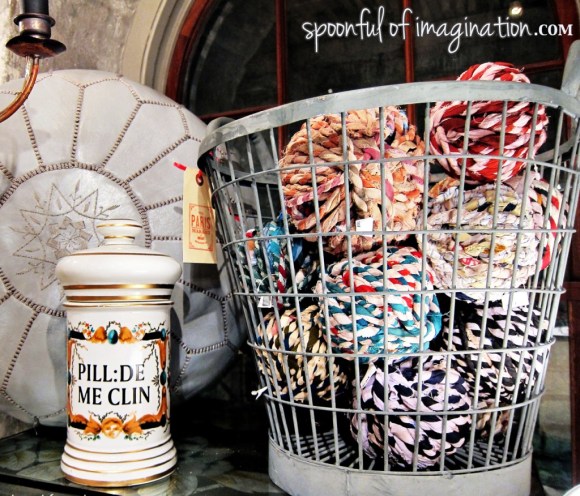
These balls were inspired from my Savannah girl’s weekend.  Do you remember seeing this picture from my trip?

While we were out shopping, I fell in love with these rustic rope balls.  They were about $8.00 a piece and I knew I could make them cheaper.  I finally attempted to make them, and I love my product.  Here is how you can do it too.

I went to my Dollar Tree and bought yellow boot laces, two packs of clothes line rope, and a package of styrofoam balls.  I ended up also getting a package of styrofoam balls from Hobby Lobby to have a slightly larger size.  Note:  I love the clothes line rope!  It is perfect Christmas colors to help decorate my house for Christmas.  Plus, there was so much of it for only costing $1.00 each!  Score!

I started by hot gluing the edge of my rope onto a styrofoam ball.  My technique was to add a strip of glue and then lay the rope on top about two inches at a time, going down one side of the ball.  I simply wrapped my ball with glue and rope going around and around to create the look of swirls.

Once my “swirls ” of glue and rope were getting smaller as I was getting near to closing the side off, I simply cut the string, added a big glob of glue, and tried to stick the edge of my rope into the glob of glue (in order to cover up any styrofoam from showing).

After you have one side complete, add a little glue at the top and start wrapping down the ball again (until the ball is totally covered up).  I made a lot of these, but I still had a ton of rope left over!

I think they came out so cute, and yet were so easy to make!  They cost so much less than their store look a likes.

My kids are enjoying throwing them all over the house.  It is nice to have a Christmas decor item that is not “breakable” or off-limits.  They can throw these and they wont break or get damaged.  Unless they throw them at something that might break 🙂.  I love red and green and can see myself keeping them out all year-long and not limiting them to just Christmas.

Although they are a rustic/child safe decor item, you can dress them up and display them in a fancier planter for a more elegant look.

My son Caleb told me this planter looked dirty as I put it in my shopping cart this week.  Oh don’t you love a child’s practical thinking!?  It does look dirty, but I love it!  I think these rope balls would even look good in a glass vase like I did with my red ornaments on my Christmas mantle.

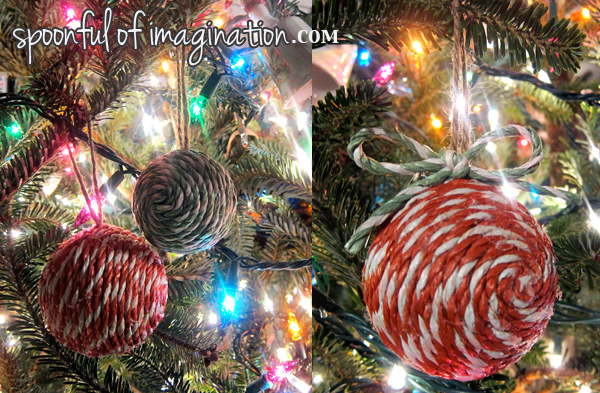
Since I had so much left over rope, I decided to get some more styrofoam balls and twist this idea into something that would make great Christmas gifts!  I made some rope ornaments!  My sister Joni, came over and we sat, talked, watched White Christmas, glued rope ornaments, and almost peed in our pants from laughing so hard.  It was a fun night!

The only difference really from just making the rope balls is adding a piece of string, rope, or ribbon first, so there is a way for your ornament to hang on the tree.  We started by cutting a small piece of rope and gluing both of the ends onto the ball.

We then did the gluing technique to add two strips of rope around the ball.  After we had our rope surrounded by the clothes line rope, we simply went down wrapping one side just like we did the ball.  From there, you complete the ornament just like you did the ball.

They look amazing just plain, or adding a simple string bow is cute too!  I think they make such a cute little addition to any gift and look great on the tree!  They are so simple, yet the rows ans rows of string add a fun texture to a rather normal style of a round ball ornament.

Do you add a personal touch to gifts?  Are you making any gifts this year?

Thank you so much for stopping by!  I hope you have a wonderful weekend!


Linked up to:  Shaken Together, Inspired by Charm, Funky Junk Interiors, Shanty 2 Chic, Miss Information, The Frugal Homemaker, DIY Show Off

Share this:

  • Click to email a link to a friend (Opens in new window)
  • Click to share on Facebook (Opens in new window)
  • Click to share on Twitter (Opens in new window)
  • Click to share on Pinterest (Opens in new window)
Next Page »
  • Email
  • Facebook
  • Instagram
  • Pinterest
  • YouTube
YouTube-Channel
Erica Deuel

Subscribe for Weekly Updates!


Most Popular Posts

Painting Flower Pot Party Tips
DIY {easy} Burlap Wreath
DIY Outdoor Checker Board
Cheap lamp to Industrial Beauty
School Desk Makeover
Chiffon Flower Tutorial
DIY Paper Butterflies- Spring decor for cheap
DIY Outdoor Table
DIY Bookends (what you can make for being a hoarder)
DIY King Size Rag Quilt {Repost}

Categories

  • All About the Kids
  • art journal
  • Blogging
  • Christmas
  • Craft Projects
  • Dancing Zebras
  • DIY
  • Eddy's postcards
  • Embroidery Journal
  • Family
  • Featured
  • Fireside Chat
  • Foster Care
  • Giveaways
  • Guest Posts
  • Home
  • Homeschooling
  • Kid Activities
  • Kid Craft
  • My Heart
  • Our Outings
  • Project Spotlight
  • Send Out Love
  • Shop
  • Sponsored Posts
  • Spoonful Lab
  • Spoonful Tribe
  • Tips + Tricks
  • Traveling
  • Uncategorized
  • Vlog

Favorite Categories

Subscribe for Weekly Updates!

Favorite Categories

© 2023 Spoonful of Imagination, Inc.