Spoonful of Imagination

Add it to a Family for Something Beautiful

  • Home
  • Our Family
    • Our Home
  • Courses
  • Shop
  • Contact

A Handmade Christmas

November 22, 2013 By Erica Deuel 5 Comments

Christmas_craze_prepWhat is it about the Holidays that seems to get earlier and crazier every year!? Don’t get me wrong, I love this season. The colorful decorating, the swarms of family, the Christmas movies, the delicious food, hearing “Baby It’s Cold Outside!” 400 times. It really is a fun time. But it can also be so busy and stressful. I work so hard to not let it go there, but I inevitably have a meltdown or two during this season.

I’ve found that if I can carve time out of the rush and find ways to create I can recapture some of the peace and joy that I think the Christmas season is actually supposed to be about.

What about you? Could you use a night away from the craziness? What about a relaxed night to sit and create with some other ladies? Some of your creations could even cross off a few items from your gift or decor list!?

That’s why I’ve created my next Spoonful Lab – A Handmade Christmas. It may sound like just another thing to do in the midst of a busy time. It’s actually designed to be a really chill environment for you to catch your breath and have fun crafting with some other girls.

Handmade_Christmas_SpoonfulLab_signYou deserve a night out. Grab this one before it slips away!

Some of the ladies from my last Lab were kind enough to share a few words about their experience:

“Already looking forward to the next one!”

“A great way to stir your creative juices in a fun and intimate setting.”

“I had a fabulous time doing something I really love with the best host EVER!!!”

“This would make a great Girls Night Out!”

“Very fun, inspiring and very well-organized, every detail was taken care of and paid attention too! I am sure it made everyone feel very special.”

“Favorite part of the night was the freedom to create after the instructions were given and seeing all the different ideas.”

“I thought it was going to be too much time, but I could have stayed longer because it was so fun.”

“It is a great tutorial for non creative people longing to be crafty.”

“The most fun I have had crafting with new friends and finding old ones there too.”

Spots are limited and we already have a great group of ladies coming to join us. So what are you waiting for? Reserve your seat at Spoonful Lab – A Handmade Christmas today!

Action_ButtonI’m busily making some fun SWAG for you and my friend Sheila at Plum Doodles has contributed something as well. Check out her fun blog for more crafty inspiration! I hope to see you some of you soon!!

stick_star_ornament

signature


Share this:

  • Click to email a link to a friend (Opens in new window)
  • Click to share on Facebook (Opens in new window)
  • Click to share on Twitter (Opens in new window)
  • Click to share on Pinterest (Opens in new window)

Fall Mantel {with tips and tricks}

September 11, 2013 By Erica Deuel 3 Comments

fall_mantel_tips_and_tricksI decorated our mantel last weekend for fall! I already loved how it was decorated, so it was a little hard at first to start messing with it at first. Now, I love it again! For someone who doesn’t like change, I can quickly adapt to holiday decor.

I wanted to share a few tips that helped me brainstorm this creation. These are tips and tricks that I used and thought through to help create this look. I hope they can help you too! After the tips, I will break down where I got each item or link to the tutorial.

1. Don’t be afraid to try something new! I had never stuck a huge piece of bark on my mantel to act as a vase.

2. Mix the different textiles. I used rustic natural elements (bark, pine cones, hay, acorns), shine (mirror, pumpkins), pottery (clay vase), burlap (handmade flowers), glass and metal (frame, lantern), wood and words (art in frame). Tip: Since I was decorating for fall, using outdoor elements naturally gave it a fall-ish feel.

3. Try to balance your colors. I was going with a more muted and fall pallet, but I made sure there was one pumpkin on the left and two on the right. That way there was a pop of color at both ends.

4. Try to use height. I like the mirror and the bark vase that added height to my mantel. It grabs your eyes a little and adds dimension rather than everything being the same height as if they were sitting on a boring book shelf. Although the picture frame is not the same height as the bark vase, it was needed to balance out the other side. The vase of burlap flowers alone was too short on that side alone. It looked neglected. Which brings me to my next point.

5. Layer and Layer your items! I have items overlapping each other other (like the hay is even hanging over the edge). My pumpkins are in front of the mirror and the frame is behind the vase. The frame almost looks like an after thought, but it was placed on purpose to add height and an added material that I had not used yet.

fall_mantel

fall_decorI love how it all came together. I especially love that little pine cone bunting hanging down on the front. Our fireplace is so white, so the pine cones and added decor really liven it up. I got so into decorating it, I dressed up the little side table next to it as well. You can see I added a fun little owl, fresh flowers, and my rustic cake stand. There is the mix of layering, using lots of different textiles and materials.

fall_decorated_mantel

fall_decorationsSince I already had almost everything the set-up only cost me $1.35 for the wood frame at a thrift store over the weekend. You probably have similar type things that you can reuse as well. Here’s the list of everything I used, where it came from, and a handful of links to DIY tutorials to a few of my items.

Wood Bark Vase: Gift from my dad that he found in his yard

Fake yellow flowers: Recycled from a center piece from my in-laws

Huge Mirror: Years ago at Walmart

Black Lantern: Ikea

Pottery vase: Gift from my sister-in-law

Burlap Flowers

Painted Pumpkins

My collection of afghans

Gray Pillow

Acorns: Gathered at our old house & saved

Silver Owl & Tall brown vase with elements: Hobby Lobby

Rustic Cake Stand

Tall lamp & Wood frame: Thrift store

Glass frame: Wedding present

Fall Subway Art free printable from the talented Erin at How to Nest For Less

fall_livingroom_decorationsI hope my little fall makeover can help inspire you to decorate and reuse a lot of the items you already have in doing so! A spoonful of imagination can go a long way in decorating! Who would have thought a piece of bark could act as vase!? Think of the possibilities and have fun!

signature

Share this:

  • Click to email a link to a friend (Opens in new window)
  • Click to share on Facebook (Opens in new window)
  • Click to share on Twitter (Opens in new window)
  • Click to share on Pinterest (Opens in new window)

Birds of a Feather Flock Together {DIY Valentines}

January 16, 2013 By Erica Deuel 9 Comments

valentines day kids craft

I am so excited to share with you these sweet Valentines I made for my kids.

The other day I was watching them all play sweetly together (which as much as they love each other does not happen all the time), and it made me think of that popular phrase “birds of a feather flock together.”  They are my sweet little flock that always wants to be together.  They love each other and it warms my heart.

Valentines day decorations

I am going to show you step by step how to make these sweet little Valentines that you can also use as Valentines decor around your house.

The materials you will need for this craft are:

  • old jar lids (from spaghetti or pickle jars)
  • spray paint
  • scrap card stock/scrap booking paper for birds legs, and nose
  • paper (I used heart wrapping paper) for the back of your bird
  • hot glue gun with glue sticks
  • feathers (found at any craft store)
  • foam heart stickers (or you could easily cut out paper hearts)
  • Googly eyes (or your could use paper or draw them on)
  • printer to print off my graphic
  • scissors
  • pen

sequence of crafting bird1

1)  The first step is to spray paint the backs of your old jar lids.

2) Use the jar lids as a stencil to draw the right size circle for the back of your bird.

3) Cut out your circles and get your hot glue gun and feathers ready to glue.

4) Put a strip of hot glue straight across about the middle (depending on size of feathers) of your lid.  Press feathers into the hot glue.  I used about 5 feathers per bird.

5) Add another strip of glue on top of the end of the feathers to glue your precut circle bird back onto the lid.  This will cover up the ugly ends of the feathers and make your bird look more finished.

6) Press your circle onto the hot glue.  Add more glue to seal down the ends as needed.

DIY bird valentines

Next, I cut out small strips of creme paper for legs and hot glued them inside the lids.  Look at the picture above, I also used red scrapbook paper to cut small hearts out to use for the birds’ heads.

craft birds with legs

I went back and folded my legs accordion style to add fun dimension to my birds.  I then used small foam heart stickers to stick on the ends of my legs to be the feet.  I used four stickers per a bird, sticking them to the front and back of the legs.  You could easily cut out hearts to do this step.  I had snatched up a big container of these hearts in the dollar section on Target and have been looking for a craft to use them on.

Next, I added some googly eyes and a small triangle I cut out of scrap paper to decorate the birds’ heads.  Simply use some more glue to stick the features on.

You are almost done!  Print out my graphic (listed at the bottom of this post) that I have made and am sharing with you for free!  I created 2.5″ circles and have put six on a sheet for you, so they are easy to cut around.  Once you print them out, cut the circles out.

birds of a feather flock together

printable graphic birds of a feather flock togetherGlue the circles into the center of your bird’s belly (inside of the lid).  I went back and wrote my kids’ names on the bottom of their Valentine.  I left that room so you could put anything you want in the open space.

homemade valentines for your kids

Your bird(s) are done!  How cute are they!  I love how it would be so easy to make a bunch of different styles of these depending on the color/size of feathers and papers you use.  I think they make sweet Valentines, but you could also use them as decorations.  I think you could even add some glue and string if you wanted to hang them from a chandelier over your table, so they seem to be “flying.”

valentines craft

One quick tip:  Watch how you glue your papers on, or you might end up with some sideways hearts like me.  🙂  See above picture.

DIY kids valentines

My kids love their Valentines (that I already gave to them!?).  Now, they want to make their own, so we are going to!  I think we will substitute the hot glue for Elmer’s glue to make it more kid safe.

DIY Valentines Day Decor

To download the birds of a feather graphic, simply click on the link below and follow your computer’s instructions to save the pdf file. Once saved, open it, print, and enjoy!

birds_of_a_feather

Are you thinking of Valentines Day yet?  Will you make any Valentines?

signature


Now let’s get this All About the Kids Party going!  Please link up YOUR new post!


Linked up at Nest of Posies

Share this:

  • Click to email a link to a friend (Opens in new window)
  • Click to share on Facebook (Opens in new window)
  • Click to share on Twitter (Opens in new window)
  • Click to share on Pinterest (Opens in new window)

DIY Rope Balls

December 14, 2012 By Erica Deuel 15 Comments


Today, I have an easy DIY rope ball craft for you.  I created these pretty rope balls from Dollar Tree supplies  At the end of this post, I will show you a simple change you can do to make the same type of ball have another use.

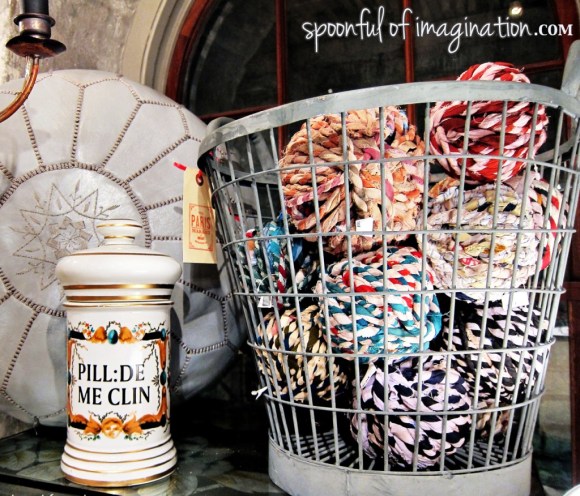
These balls were inspired from my Savannah girl’s weekend.  Do you remember seeing this picture from my trip?

While we were out shopping, I fell in love with these rustic rope balls.  They were about $8.00 a piece and I knew I could make them cheaper.  I finally attempted to make them, and I love my product.  Here is how you can do it too.

I went to my Dollar Tree and bought yellow boot laces, two packs of clothes line rope, and a package of styrofoam balls.  I ended up also getting a package of styrofoam balls from Hobby Lobby to have a slightly larger size.  Note:  I love the clothes line rope!  It is perfect Christmas colors to help decorate my house for Christmas.  Plus, there was so much of it for only costing $1.00 each!  Score!

I started by hot gluing the edge of my rope onto a styrofoam ball.  My technique was to add a strip of glue and then lay the rope on top about two inches at a time, going down one side of the ball.  I simply wrapped my ball with glue and rope going around and around to create the look of swirls.

Once my “swirls ” of glue and rope were getting smaller as I was getting near to closing the side off, I simply cut the string, added a big glob of glue, and tried to stick the edge of my rope into the glob of glue (in order to cover up any styrofoam from showing).

After you have one side complete, add a little glue at the top and start wrapping down the ball again (until the ball is totally covered up).  I made a lot of these, but I still had a ton of rope left over!

I think they came out so cute, and yet were so easy to make!  They cost so much less than their store look a likes.

My kids are enjoying throwing them all over the house.  It is nice to have a Christmas decor item that is not “breakable” or off-limits.  They can throw these and they wont break or get damaged.  Unless they throw them at something that might break 🙂.  I love red and green and can see myself keeping them out all year-long and not limiting them to just Christmas.

Although they are a rustic/child safe decor item, you can dress them up and display them in a fancier planter for a more elegant look.

My son Caleb told me this planter looked dirty as I put it in my shopping cart this week.  Oh don’t you love a child’s practical thinking!?  It does look dirty, but I love it!  I think these rope balls would even look good in a glass vase like I did with my red ornaments on my Christmas mantle.

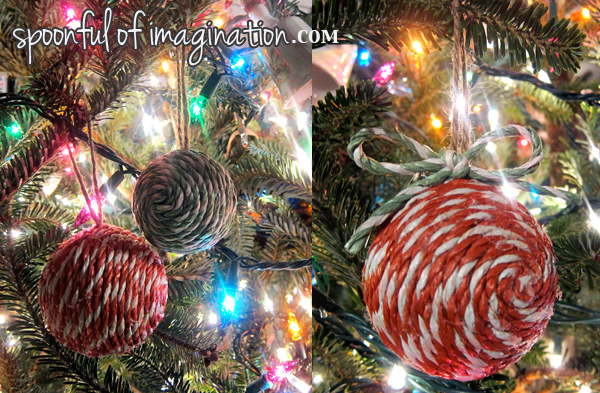
Since I had so much left over rope, I decided to get some more styrofoam balls and twist this idea into something that would make great Christmas gifts!  I made some rope ornaments!  My sister Joni, came over and we sat, talked, watched White Christmas, glued rope ornaments, and almost peed in our pants from laughing so hard.  It was a fun night!

The only difference really from just making the rope balls is adding a piece of string, rope, or ribbon first, so there is a way for your ornament to hang on the tree.  We started by cutting a small piece of rope and gluing both of the ends onto the ball.

We then did the gluing technique to add two strips of rope around the ball.  After we had our rope surrounded by the clothes line rope, we simply went down wrapping one side just like we did the ball.  From there, you complete the ornament just like you did the ball.

They look amazing just plain, or adding a simple string bow is cute too!  I think they make such a cute little addition to any gift and look great on the tree!  They are so simple, yet the rows ans rows of string add a fun texture to a rather normal style of a round ball ornament.

Do you add a personal touch to gifts?  Are you making any gifts this year?

Thank you so much for stopping by!  I hope you have a wonderful weekend!


Linked up to:  Shaken Together, Inspired by Charm, Funky Junk Interiors, Shanty 2 Chic, Miss Information, The Frugal Homemaker, DIY Show Off

Share this:

  • Click to email a link to a friend (Opens in new window)
  • Click to share on Facebook (Opens in new window)
  • Click to share on Twitter (Opens in new window)
  • Click to share on Pinterest (Opens in new window)
  • Email
  • Facebook
  • Instagram
  • Pinterest
  • YouTube
YouTube-Channel
Erica Deuel

Subscribe for Weekly Updates!


Most Popular Posts

Painting Flower Pot Party Tips
DIY {easy} Burlap Wreath
Cheap lamp to Industrial Beauty
Engraved Wood Sign Tutorial (and Dremel Micro)
Repurpose Old Kitchen Chairs
The Encanto, Madrigal's House Craft For Kids
DIY Outdoor Checker Board
DIY Bookends (what you can make for being a hoarder)
The Way I Thrift
Chiffon Flower Tutorial

Categories

  • All About the Kids
  • art journal
  • Blogging
  • Christmas
  • Craft Projects
  • Dancing Zebras
  • DIY
  • Eddy's postcards
  • Embroidery Journal
  • Family
  • Featured
  • Foster Care
  • Giveaways
  • Guest Posts
  • Home
  • Homeschooling
  • Kid Activities
  • Kid Craft
  • My Heart
  • Our Outings
  • Project Spotlight
  • Send Out Love
  • Shop
  • Sponsored Posts
  • Spoonful Lab
  • Spoonful Tribe
  • Tips + Tricks
  • Traveling
  • Uncategorized
  • Vlog

Favorite Categories

Subscribe for Weekly Updates!

Favorite Categories

© 2023 Spoonful of Imagination, Inc.