Spoonful of Imagination

Add it to a Family for Something Beautiful

  • Home
  • Our Family
    • Our Home
  • Courses
  • Shop
  • Contact

Butterfly Nature Craft for Kids

April 23, 2023 By Erica Deuel Leave a Comment

What is a better way to celebrate that spring is here with young kids than to do a craft together!? This butterfly nature craft is a perfect opportunity to have fun, get outside, encourage the imagination and teach new vocabulary with your young artists.

This multi step project allows you to prep a little and the artists to paint, explore, and design. It’s fun and I’m pretty sure it can keep your artist happily entertained for a WHILE! Let’s dive in…

The first step is to collect some cardboard.

Grab a cardboard box and cut it into a fun shape. We did a butterfly in this sample, but you could also keep it simple with a rectangle and turn that into a picture frame!

Divid the cardboard into sections with rubber bands.

Simply slip rubber bands onto your cardboard image to create some natural divisions in the design.

Painting comes next!

We kept it pretty simple with including only 3 tempera paints for our sample and a q-tip for each color. One thing with creating is we can control the mess by how many supplies we put out. Don’t be afraid to put out less.

It allows artists to experiment and try new things. Simplicity breeds invention. For example, we didn’t give purple paint. In the creating process, colors can be combined to make new colors and purple can be created with the colors we provided.

This paint project allows your artist to learn some new vocabulary.

  • They can paint by doing lots of dots to create a pointillism look. The goal is to collage each section of the butterfly with color to fill the whole image.
  • They can practice painting semetrical so the sides are identical or not- it’s up to their taste!

While the butterfly dries, your artist can go on a scavenger hunt.

Can they pick, find or cut small nature clippings like these:

    • dandelion
    • grass clipping
    • leaf
    • feather
    • stick

Once the butterfly is dry, your artist can stick the little nature clippings into the rubber bands on the butterfly.

This butterfly nature craft can be done or you can explore with more details and textures.

We added some circle stickers to help hold the natural elements in place and allow another texture to be in the project. Kids love stickers, right!? You can’t go wrong with stickers as a detail.

It is our hope that in each step of the project your artist can create, play and imagine the possibilities! There’s even a good chance that on the nature scavenger hunt, your artist starts playing organically outside. It’s a win-win.

If this craft sounds fun, but you don’t want to do all the prep- you are in luck. We have a few kits listed in our online store. You can jump over there and see if they are still in stock!

Have fun and get out and enjoy the blooming plants this spring season!

Share this:

  • Click to email a link to a friend (Opens in new window)
  • Click to share on Facebook (Opens in new window)
  • Click to share on Twitter (Opens in new window)
  • Click to share on Pinterest (Opens in new window)

Celebrate Earth Day 2023 with your artist!

April 18, 2023 By Erica Deuel Leave a Comment

I love teamwork. (**stay tuned to later in this post where I share Earth Day Craft kits for $1). In celebrating, Earth Day 2023 we can practice working as a team.

It can sometimes be overwhelming to work with others. We may feel like we get lost in the discussion or like we could handle things better, if we did it on our own. Yet, we have all been there, when the overwhelm and stress sneaks in from trying to tackle something too big solo.

We need one another.

There’s big issues like our planet that we literally can’t take on by ourselves. We need everyone working together as a team to help preserve our earth. This Saturday, April 22 is Earth Day.

Earth Day is an annual celebration that honors the environment and raises awareness of the need to protect the Earth’s natural resources for future generations.

These are all little changes to our habits, if we collectively do together, they can leave a big wake of change. Just imagine the possibilities! One of those above ways may be easier for you than the others. Lean into it!

For me, recycling and reusing trash is one of my favorite ways to give more life to already created objects. We can do so much with tools and resources that come into our home daily-rather than just tossing them out!

One of my favorite materials to recycle into something new are soup cans!

As an art instructor and mom, I know one of the easiest ways to have a conversation with a child, is to have a project that goes along with it.

It opens the door to have a tangible, physical element to refer back to.

Save your cans and use them in a craft with your artist this week to talk about Earth Day 2023!

If you need help, I have some pre-prepped cans with paint + yarn as a kit for just $1 each this week in honor of Earth Day. Snatch up your kits today!

Share this:

  • Click to email a link to a friend (Opens in new window)
  • Click to share on Facebook (Opens in new window)
  • Click to share on Twitter (Opens in new window)
  • Click to share on Pinterest (Opens in new window)

Recycled Candlesticks From an Old Toy!

October 13, 2022 By Erica Deuel Leave a Comment

recycled candlesticks

Do you have a hard time throwing some things away? There are lots of things I don’t think twice about. Clothes, pillows, dishes are few that I don’t blink an eye at. Maybe one of those are the thing that’s hard for you? For me, I definitely have a hard time throwing wood things away.

Wood seems timeless. It can be painted, stained and built onto and is such a sustainable product. Recently, my Jeremiah was cleaning out his closet and found this wood marble run toy. He didn’t want it anymore, and I kept looking at it thinking there has gotta be something I can create with this old toy!

I looked at the size of wood. They were perfect fun, block size pieces.

I looked at the texture. They were smooth, already sanded, sturdy pieces.

As I stared at the pieces, I realized I could turn them into a recycled candlestick holder.

Recycled Candlesticks Make Fun, Quirky Decor!

I found a wood circle in our garage to be a bigger base and gave that a quick sanding. I then added a little superglue to hold the pieces together and let them dry. I had so much fun moving the pieces around to see what size and angle I wanted them to be. The candlesticks looked really pretty just left as wood, but you know me. I love color, so I added some acrylic paint to jazz them up a bit.

After the recycled candlesticks were dry, I was ready to display them and enjoy! I love mixing homemade decor into our home. These added a fun element to our kitchen table.

recycled candlesticks made from an old toy

I love how they look in my office too, so only time will tell on where they officially end up. How fun are they!? I made something new from something that was almost just trashed or donated away.

My favorite ways to get creative are often to use something that is not expected. I like to use things we wouldn’t find in a craft store.

Being creative is just a process of pairing ideas.

recycled candlesticks

The Creative Process Doesn’t Have to Be Expensive.

We all have things we can repurpose and reuse to make something new.

One way to see things in a new way is to make sure our tanks are full. We can’t be operating on fumes, lack of sleep, deprived of things that bring us joy to have eyes to see things differently. It takes space to have energy or margin to think differently than our auto pilot normal.

That is the most expensive part of the creative process. It requires us to be more whole to think creatively.

recycled candlesticks

I am so excited about my new recycled candlesticks. Now, my mind is going trying to think of other things that would make great candlesticks. Fall is a great time to light some candles to bring some warm and comfort inside as the world is getting colder on the outside.

So, do you have something you can look at with new eyes and make something different out of it? If you need help with this, join us in my 30 Day Imaginative Journey. We are practicing small, quick exercises to get us thinking and practicing growing our creative muscles! Download your free calendar here!

Check out what my Reagan made for her Halloween costume out of trash, which was from one of the imaginative prompts!

Share this:

  • Click to email a link to a friend (Opens in new window)
  • Click to share on Facebook (Opens in new window)
  • Click to share on Twitter (Opens in new window)
  • Click to share on Pinterest (Opens in new window)

Fourth of July Preparation -with kids!

June 27, 2022 By Erica Deuel Leave a Comment

Do you love to celebrate the seasons with your artists by creating? Letting your artists help “decorate” is such an empowering, confidence building gift to invest in your child!

It is also such a fun way to talk about the upcoming season, by creating together. We designed this project to be all about the process! So, you can have fun being together, as you do all that!

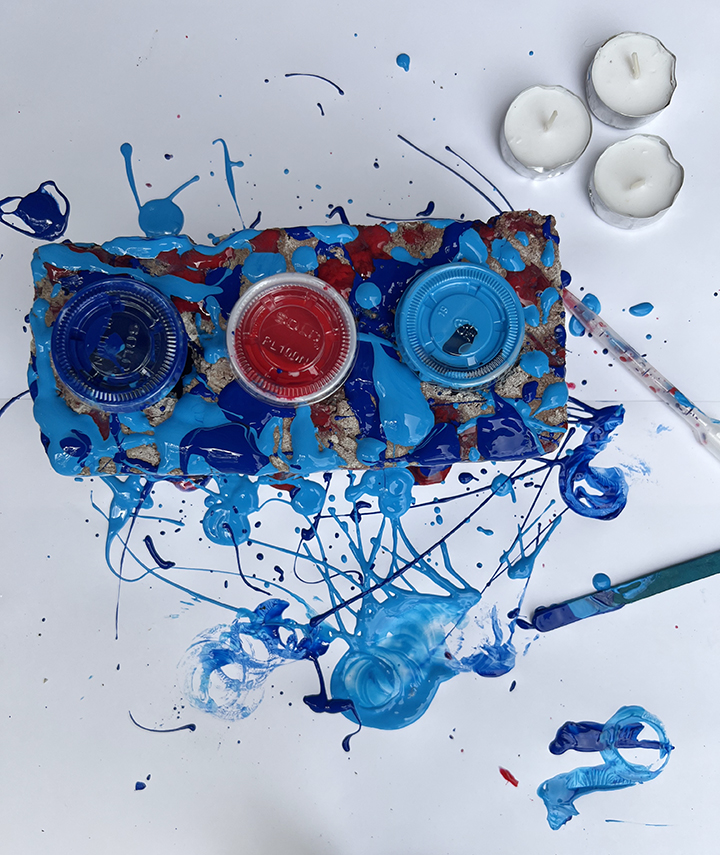
Splatter, drizzle, squeeze, and pour paint to create your one of a kind Fourth of July centerpiece. Use it to hold candles or stick silverware in it for a utensil holder in the buffet line. There’s so many possibilities, when we use our imaginations!

What started as a phone call from Matt saying, “hey, do you want any of these old bricks?” led to such a fun process art paint project! I hope you enjoy it as much as I did.

If you don’t have any old bricks on hand, I know you can get some at a hardware store for less than $1.00 each. Here are some basic supplies to get you started. Please feel free to use what you have, or if you are local, you can pick this kit up in our shop as well.

Supplies:

brick (with holes)

paints

paper cup

stirrer (like a popsicle stick)

pipette

tea light candles (optional)

Once you have all your supplies out, you are almost ready to have some fun! You might be able to tell that I laid some paper down before I started painting. This project can get a little messy, so protect your surface. I also used washable Tempera paints. That means this centerpiece can’t stay outside for forever. The rain will wash our beauitful colors off, but it also means if paint splatters somewhere unwanted, it will come off too. Once you are set up, you are ready!

1. Splatter

Every kid loves to splatter paint. Use the popsicle stick or any stick you might have to scoop a little paint up and flick it onto the brick. It creates fun splatters of globs and some strains of stringing paint. I love the mix of amounts that get placed and that you can’t really control the outcome. It’s freeing!

2. Drizzle

This is a little bit slower of a technique then the splatter painting. As you scoop up the paint with the stick, you let it slowly fall off the stick, so it creates like a drizzle effect as you move your hand around. This has a bit more control as you can determine how much paint falls in a particular area before you move your hand -thus, moving the paint! I tired to aim for the areas that the dark blue paint didn’t get splattered.

3. Squeeze

Pipette’s are such a fun little tool to paint with! You can also use a small syringe, baby nasal aspirator, or pool toy that does the same technique of sucking up liquid! I used a small paper cup with a little water in it to pour some of my paint in on top. I then used the pipette to stir the water + paint mixture to create a more runny, liquefied paint. The pipette then sucked up that newly created paint and I got to spray it wherever I wanted.

Again, this can be a more controlled painting step then the splatter paint. It depends on how high in the air you squeeze the paint. Play around with squeezing it low to the brick verse about 2 feet high. Talk about aim and the different effects the height had.

4. Pour

How often do you just get to pour paint!? It’s not something that happens a lot as it can be considered “wasting”. I would argue that it is also a freeing step that gives a different look and teaches things like spacing, managing, and control. Pour a little paint and watch it drip down the sides of the brick! it can be mesmerizing!

5. Dry

This might be the hardest step! After layers and layers of paint, the newly created decoration is going to take some time to dry. It might test your young artist’s patience. That’s another valuable skill to invest in! Try to not touch the brick, while this important step happens. It helps if the brick sits in that hot June/July sun to dry more quickly!

6.  Decorate and enjoy

Once your newly created centerpiece is dry, you are ready to enjoy it! Place tea light candles it for a fun decoration or use it as a utensil holder in the buffet line!

We know your artist will get so excited explaining how he/she made it to all your Fourth of July visitors!

Have fun and embrace the process! The best part is this was hopefully a really fun memory with your artist. The second best was it was also really cheap. Throw the brick out after the holiday and create a new one next year! There is no need to store it.

Just get creating memories and fun!

Share this:

  • Click to email a link to a friend (Opens in new window)
  • Click to share on Facebook (Opens in new window)
  • Click to share on Twitter (Opens in new window)
  • Click to share on Pinterest (Opens in new window)
Next Page »
  • Email
  • Facebook
  • Instagram
  • Pinterest
  • YouTube
YouTube-Channel
Erica Deuel

Subscribe for Weekly Updates!


Most Popular Posts

DIY Outdoor Table

Categories

  • All About the Kids
  • art journal
  • Blogging
  • Christmas
  • Craft Projects
  • Dancing Zebras
  • DIY
  • Eddy's postcards
  • Embroidery Journal
  • Family
  • Featured
  • Fireside Chat
  • Foster Care
  • Giveaways
  • Guest Posts
  • Home
  • Homeschooling
  • Kid Activities
  • Kid Craft
  • My Heart
  • Our Outings
  • Project Spotlight
  • Send Out Love
  • Shop
  • Sponsored Posts
  • Spoonful Lab
  • Spoonful Tribe
  • Tips + Tricks
  • Traveling
  • Uncategorized
  • Vlog

Favorite Categories

Subscribe for Weekly Updates!

Favorite Categories

© 2025 Spoonful of Imagination, Inc.