 Do you love recycling trash into treasures as much as we do!?
Art doesn’t have to be expensive. Using things you might normally throw away as art supplies is one way to create in an inexpensive way! Soup cans are one of our favorite recycling materials to repurpose into a fun craft. It is sturdy and strong and be a great base for something else.
Today, we are excited to show you how you can turn those cans into marbleized storage canisters.
![]() The first step is to collect your soup cans. We have gotten in the habit of just saving all our soup cans, so when a project idea arises, we are ready with cans on hand. I take the paper wrapper off our soup cans and run them through the dishwasher with our dishes to get clean. Once you have your dry cans, you are ready to create! We spray painted our cans white to have a nice matte base coat for this project.
The first step is to collect your soup cans. We have gotten in the habit of just saving all our soup cans, so when a project idea arises, we are ready with cans on hand. I take the paper wrapper off our soup cans and run them through the dishwasher with our dishes to get clean. Once you have your dry cans, you are ready to create! We spray painted our cans white to have a nice matte base coat for this project. 
 While the tin cans were drying, we collected our spray paint cans and filled a bucket with water. For each can, we choose two different spray paint colors. We added one color at a time.
All you have to do is spray the water with your spray paint color. The spray paint sits on top of the water. You then lay the can on top of the water and the paint will adhere to the can like a sticker might grab onto your hand. After one color was added, we simply looked at the can, maybe rotated it a little to figure out what side needed some more color, and did this step again with the second color of paint.


![]() The can comes out of the water looked marbleized and super fun! After you get the hang of it, you can play with how much spray paint you spray on top of the water to create a more thick or less thick look on your can. We had so much fun doing all four of our cans that we prepped!
The can comes out of the water looked marbleized and super fun! After you get the hang of it, you can play with how much spray paint you spray on top of the water to create a more thick or less thick look on your can. We had so much fun doing all four of our cans that we prepped!

 After the cans were dry, we used ours to hold art supplies. You could do the same or turn it into something else! A wind chime, flower pot, vase, or candle holder are fun ways to use your new canister too.
  You can personalize this craft using colors that fit your taste or the size can that fits your need best.
Sometimes it is easier to understand the steps to a project to see it actually happen. To see this craft in video form, you can watch the process on our YouTube channel here.
We love how quick, colorful, process art base, and inexpensive this paint technique can be! We had so much fun doing it to the tin cans that we bought some inexpensive raw wood candle sicks to paint this way too!
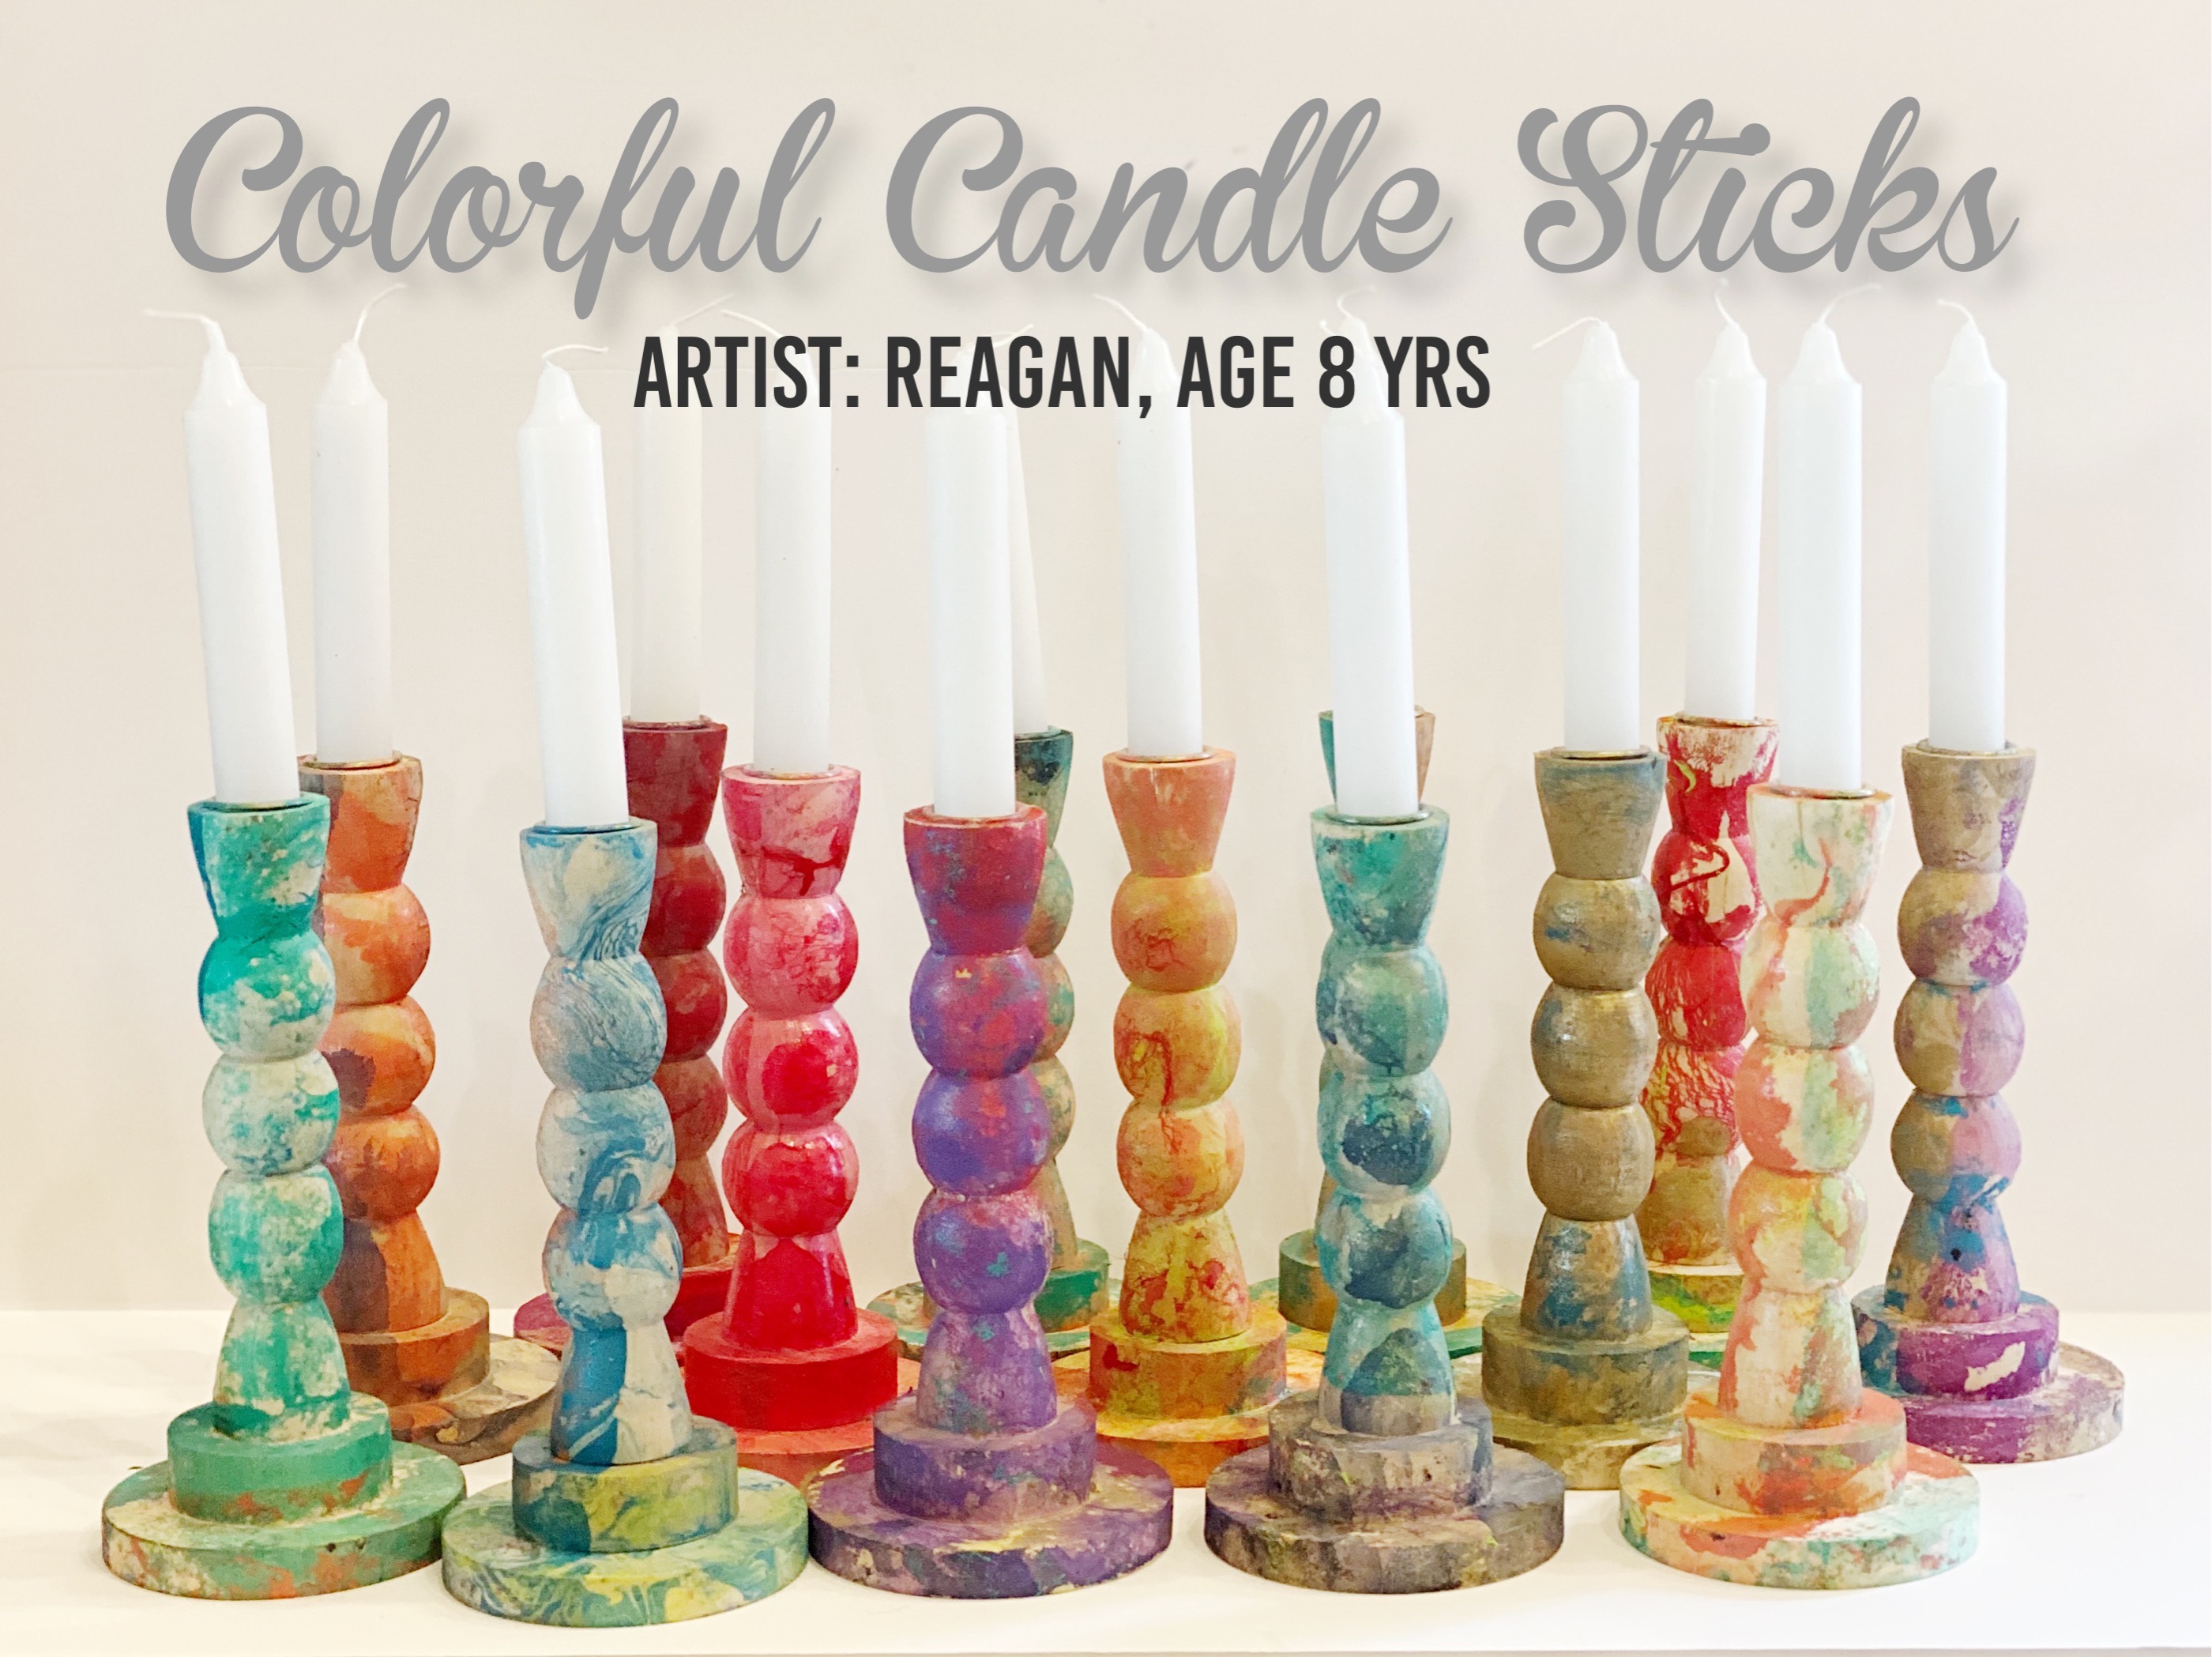 How fun are those!? We think they look like they belong on shelves in World Market or Anthropologie. We found some white candle sticks that make the colors pop even more, and we are going to use them as Christmas presents for family this year!
What do you think!? Will you try this paint technique? Do you like making Christmas gifts too!? We’d love to hear from you! Find us on social media by tagging us with your pictures #spoonfulofimagination
Thanks so much for stopping by!

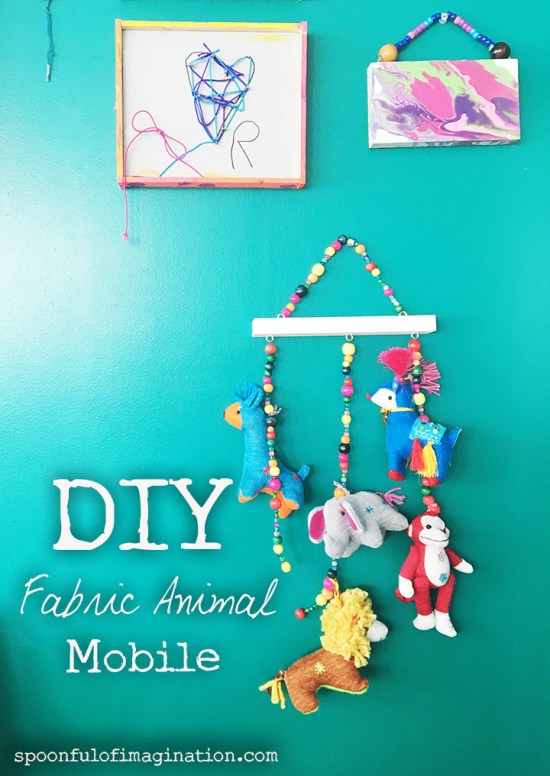 Have you seen the cute fabric Christmas ornaments that are out there these days!? I stared at a bin of them at Target in the fall wanting to buy them all but knew our poor Christmas tree is already overrun with ornaments. So, I sadly passed them by. Now that Christmas is over, I saw these babies at 50% off, and I snatched them up. If you hurry, maybe you can still find some too.
 The first step was to cut all the tags off the ornaments-including the fabric one sewn to the ornament. I still fear some of those tags are like the ones on mattresses you aren’t supposed to cut off or risk serving some time in the slammer, should the mattress inspector ever catch you!? Whatever the case may be, remove all the tags… you just didn’t hear that from me. 😉
  The hanger strings are designed to go around a Christmas tree branch and still hang down a couple of inches. For this project, you don’t need that kind of length from the hanger. So, I tied a knot in the hanger string and cut off past the knot to make the hanger “smaller”. All you need is a simple loop to be able to attach your ornament to the mobile.
 This is the fun part. I had my girl help me. We used a leftover scrap piece of wood and attached some eye-hooks to it. We used five eye hooks. Three on the bottom to hang the ornaments. Two on the top to eventually hang the mobile. You can simply use a piece of wood. A rustic natural stick would also look cool!

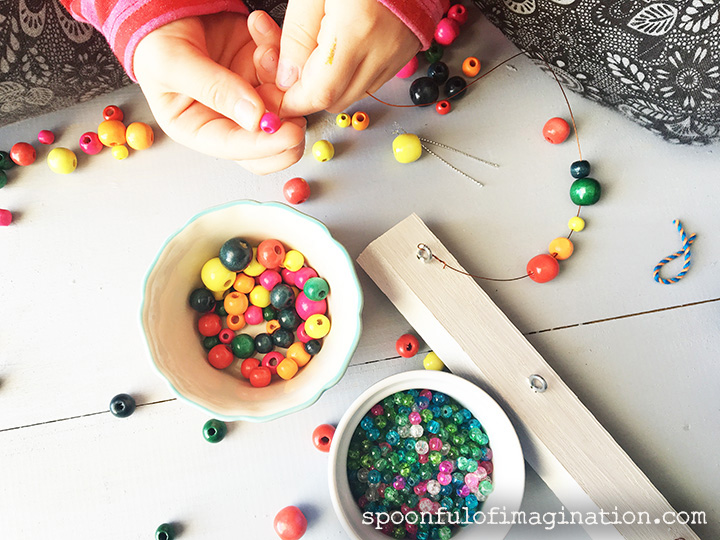 After feeding some beads onto your wire, feed a Christmas ornament onto the string as well. We then put a large bead after the ornament, so the ornament wouldn’t slide down and off our hanger.
 You can use your creativity to determine how long you want your pieces to be, how many go along your wood base, and how you want to hang that piece up on the wall. We ended up putting beads on our hanger. You can also do this whole project without beads, if you want it to be more baby friendly for above a bed. Just use the concept of turning Christmas ornaments into a mobile and go crazy making it yours!
 If you do use beads, make sure you tie a big knot at the end or wrap the wire around a bead well, so everything stays on and doesn’t slip off or come undone easily.
 What do you think!? Is this something you would create? I’ve seen mobiles that cost a lot. Think of how cheap you can make a fun wall piece by using ornaments you already have or you find on clearance? This one has ended up decorating the walls of our art studio and used in a gallery wall with kids art. Where would you put your mobile?
 Thanks so much for reading. Happy New Year! We trust you have had a good holiday season with family and friends. We have lots of fun projects planned for this new year, and we can’t wait to share them with you! As always, if you do one of our projects, please tag us on social media and use hashtag #spoonfulproject so we can see it!
 Do you love Christmas crafts as much as I do!? It seems that no matter how many I make, the following year I want to make more! Creating holiday crafts is one of my favorite holiday traditions and stringing together a fun garland is a fun way to add to the seasonal decor. In years past, I have made other
  How pretty are those colors all mixed up together!? I decided to drill a small hole in the center of each piece. This would allow me to later thread wire through to create a garland.


 Once I had a big pile of scrapwood drilled and ready to go, I attached one to the end of a strong wire to tie off the end of my garland. I then asked for little hands to thread the pieces on. My Jeremiah helped me. I wanted the pieces to be random without any order of size or color. Having a child help with this creative step is fun.

 We quickly realized that having all the pieces stacked neatly on top of one another was using up a lot of wood and our garland was getting heavy QUICKLY! We stopped. We took everything off and threaded our wire through a needle and then strung 1″ felt balls after every few pieces of wood. This really helped the wood pieces separate, give another texture, and help lighten the weight of the garland.
 I LOVE how it came out. I immediately started sending pictures to friends who I know also have lots of scrap wood. It’s just too fun not to share.
 A couple tips if you do this project,
 We didn’t even have our tree decorated yet, and I was hanging my garland up and snapping pictures. Making something you are proud of is a crafter’s highlight. What do you think!? What colors would you hope your garland would be? We are decorating our house with more bright colors this year than in years past.
 In this day and age of online shopping and gift cards, it can be a struggle to make gift giving feel personal. Don’t get me wrong, I certainly send my share of gift cards and I love when I receive them… but this year I am determined to add a personal touch that helps add to my gifts – DIY Gift Toppers.
 Once I had my pieces, I did a quick sanding to smooth down the corners and edges. I pulled out a variety of spray paints. I then gave my wood pieces one coat for a background color. You could go with acrylic paint, but it will probably take a couple of coats.
 Once you’ve completed painting, the next step is to drill a small hole for the Gift Topper to be tied onto your gift or to add it’s hanging strap like I did on mine below.
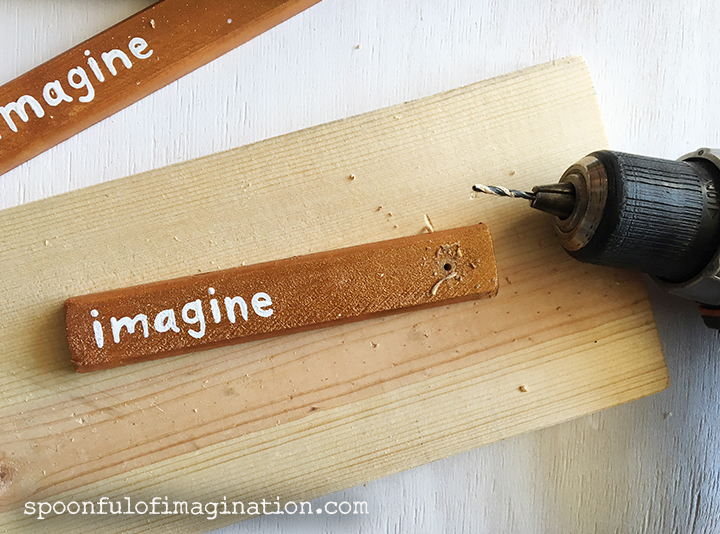 I cut elastic strands in 8-10 inch pieces and then tied them to my Gift Toppers. Originally, I was just going to tie the Gift Toppers to the gift as is. But then it clicked, by adding this little extra step, the Gift Topper becomes part of the gift. It can be later hung as an ornament or decoration around the house.
 If you want one more touch, you can also go back to your finished wood pieces and do a little more sanding or possibly even staining to give them that worn rustic charm.
 I just love these little things, and I’m so excited to put them under the tree. I hope you do too! Please make some and add your own variations and embellishments. Just make sure to share it on social media using #spoonfulproject so we can all enjoy your creation.