 Have you ever looked at your child creating something and thought “how did they think of that?” It happens over here a lot. I am constantly amazed at my kids’ creativity, and it really shows in their cardboard costumes. I love Walt Disney’s quote,
“our greatest natural resource is the minds of our children.”
This quote sums up the process of my children creating something they need. We try to go as thrifty as we can for Halloween costumes. I love dress up and I love creativity and it feels like Halloween can merge those two passions so beautifully. Cardboard is a cheap material, so they often opt to make a cardboard costume for Halloween.

Do I Buy or Make a Costume?
For the record, I am NOT about paying a ton for a costume that you wear one time. Yet, we had probably a half dozen Toy Story costumes when our kids were younger because they literally lived in them all day long.
So, knowing your children and their interest level is important when deciding how invested you want to be in a Halloween costume.
Now that we have big kids, they wont wear the costume again. Dress up is not one of their everyday hobbies anymore. In that case, we want to have fun, play, and have something to wear and celebrate the day. Cardboard costumes can be quick, resourceful, inexpensive, fun and get the job done.

What do I need to create a DIY Cardboard Costume?
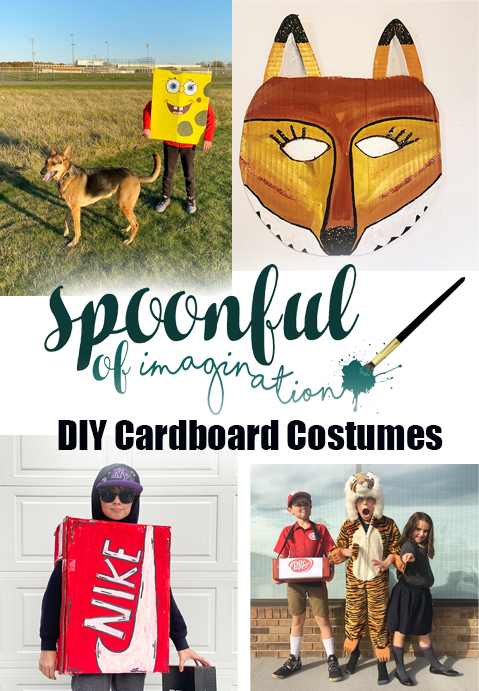
Big boxes can be the whole costume. I will never forget being out on a walk and seeing Sponge Bob run up to me. It was one of the funniest parenting moments. Who expects to see their child in a cardboard box version of Sponge Bob run up to them!?
A box box can be taped shut, painted and have holes cut for the arms and legs and be pretty amazing.
Our Caleb loves shoes. He buys shoes, he paints shoes, he draws shoes, and he even sells shoes. Do you know anyone like that? You can see more of his love for shoes/art on his YouTube channel. It made perfect sense that he would dress up as a shoe box one year. When we let our kids create their own costume, it can be more personalized and tuned to their individual interests.
 Maybe you just have a sheet of cardboard laying around. It ca be turned into a mask. It can be as big as a pumpkin (wearing sunglasses) or smaller like an animal face. I love that the DIY style lets you be as elaborate or simple your time frame and heart’s desire cares to invest.
Our Reagan loves to create, so of course she spent more time on the fox mask than I did on the large cardboard piece we used for a skit.
 We all are ordering online these days. By having things we love shipped directly to our door, we can have smaller cardboard boxes pile up. Am I right!? A smaller cardboard box can be the perfect addition to clothes you already have at home.
Have you ever been to a stadium baseball game or basketball game where the ushers are going up and down the stairs selling drinks? One year, our Caleb dressed up as a Dr. Pepper sales guy and it still makes me laugh to look at this picture. DIY Cardboard costumes can be hilarious and so fun. Caleb literally gave away some caned Dr. Peppers during our trick or treating that night. You should have seen the kids asking to trade candy for a drink with him!
 What do you think? Do you still need a costume for this year’s trick or treating or Halloween party? Have fun imagining the possibilities! You can save a trip to Walmart and some $ by recycling your cardboard box into a creative costume.
 Need more help tapping into your exquisite imagination? Join me in this 30 day challenge to practice imagining and allow the interesting, rewarding possibilities to emerge!

 It’s the week of hearts.
 I started with a bunch of cardboard boxes. I cut off the box flaps and use those pieces to then cut into heart shapes.
 After I painted my hearts and they were completely dry, I used Elmers glue to attach them to one another. I used blue Elmers Glue, only because it was the first glue I found. Any school glue or hot glue would work!
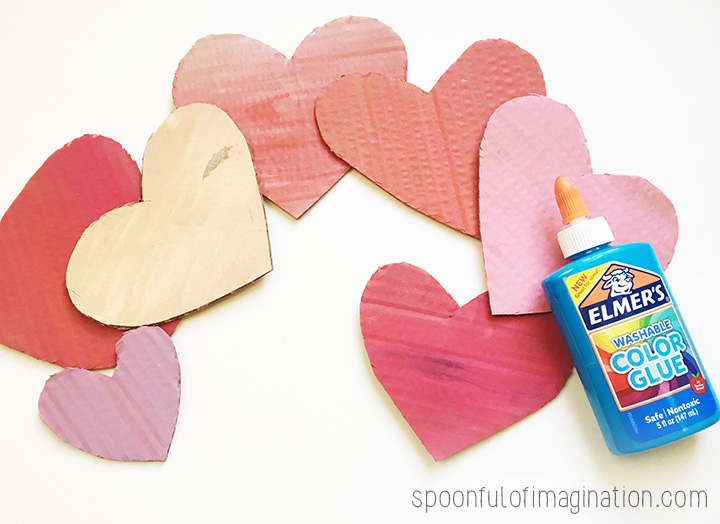

 You can probably tell by the pictures I created a base with the bigger hearts and then the smaller ones on top. It helps create a thicker, 3d shape and gives it some depth.
 After I made my wreath, I thought this could be such a fun quick class party craft.
 Did you ever build forts as a kid? Do your kids build forts now? We often use blankets to create forts and we lay them over chairs and tables to create a fun hideout.
 In
In 

 If you haven’t watched the video (or maybe you have but written instructions help you!), here is a list of some basic craft items that you might need to get you started. As always though, feel free to make this project your own. You do not need all these supplies to make a box fort. We have also made box forts with just one box and a marker. That’s it. The possibilities are endless.

 We loved seeing our kids’ imaginations come alive. Everyone thinks differently and it can be seen in art. I know I would never have thought to rip up blue paper to create water, but Reagan did. Her creativity encourages me and makes me want to create.
 What do you think!? Would you paint in your living room too!? Or did you shudder when we did that!?