Spoonful of Imagination

Add it to a Family for Something Beautiful

  • Home
  • Our Family
    • Our Home
  • Courses
  • Shop
  • Contact

DIY Wood Shelves

June 23, 2015 By Erica Deuel 2 Comments

bedroom_shelvesFor months my boys have slowly been adding things to their dressers. It started as one small card or lego creation to a full on craze. In their eyes, it is the most beautiful mess.

messy_kids_dressersDo you see the beauty as well or do your mom nerves (like mine) kind of cringe too at those pictures? You can see what the chartreuse dresser first looked like here and my son’s red dresser/chalkboard wall here.

They have reached this age that when I ask them to pick up their room and toys there are things they don’t want just thrown in a bucket.

I found myself in this pivotal mom moment. I don’t want to raise my kids with a passion of things, but I also want them to appreciate what they have and take care of those things well. Throwing action figures in a bucket of toys is one thing, but there are things like their art, trophies, pen pal letters, basketball card collection, nature collections, Hawks programs, movie tickets, and mementos of ‘home’ that are special. Most of these things are items that I could say, “throw them in a drawer,” but then I remember…Those things they are proud of.

They want to see them easily and know that they wont be messed with by siblings/friends/dogs. Their little lives don’t have all the milestones, scars, and triumphs ours have had. Those things are their memories. In time, some might get thrown out, but for today they are held tightly. My boys will feel loved by me showing a little love for things that are important to them, so I have refrained from telling them to throw stuff out or hide it merely for my OCD tendencies.

I realized that they needed shelves. Having one central area dedicated to this would be wonderful, so it was time to get out my tools.

I started by shopping for some wood.

picking_out_wood_for_shelvesYou may have some of these supplies on hand, but a lot of the supplies can be altered depending on how you finish your shelves off. I will list the supplies I used to make my shelves, but just know you can alter and make do with different things to get this same look.

Supplies:

  • 10″ x 1″ boards for the shelves
  • garden stacks
  • Ryobi Sander
  • Ryobi nail gun
  • Wood filler
  • Wood Stain
  • Foam brush
  • Ikea Shelf brackets (these were $0.49 each in my store)

The first step I did was measure the little nook where I wanted my shelves to go here in my boys’ room.

roommate_TNMT_decalFrom wall to wall it measured 35″, so I used my Ryobi Miter Saw and cut all my boards (including my garden stacks) 34 1/2″. I then sanded the boards.

wood_sanderAfter all the boards were sanded, I used my nail gun and nailed the garden stacks to one side of the 10″ wide boards. My original thought was that this little lip would face down and create an illusion that the shelf boards were made from a thicker, rustic wood. While nailing the boards together though, I decided to use the lip face up, so it created a little wall that could help keep the boys stuff from falling off the shelf easily. This is a boys’ room with a basketball hoop on the bunk bed, so who knows what can happen.

working_at_home

wood_shelvesAfter all the shelves were pieced together, I used wood filler to cover my nail holes. I let the wood filler completely dry, sanded over it, and was then ready to stain my shelves.

wood_fillerI used a foam craft brush and painted the stain on. I left it to completely dry (instead of rubbing it off with a cloth). I wanted a dark look. I did both sides and then my part was done!

wood_staining

wood_stainMatt did the hard part of measuring, spacing the shelves out, and making sure they were level. These little plastic braces were so inexpensive, yet they totally work. I think they look great! We didn’t have any black screws on hand, so we used the silver we had and I went back and painted a little acrylic paint over each screw and you can’t tell the difference.

DIY_wood_shelves

wood_shelves_tutorial
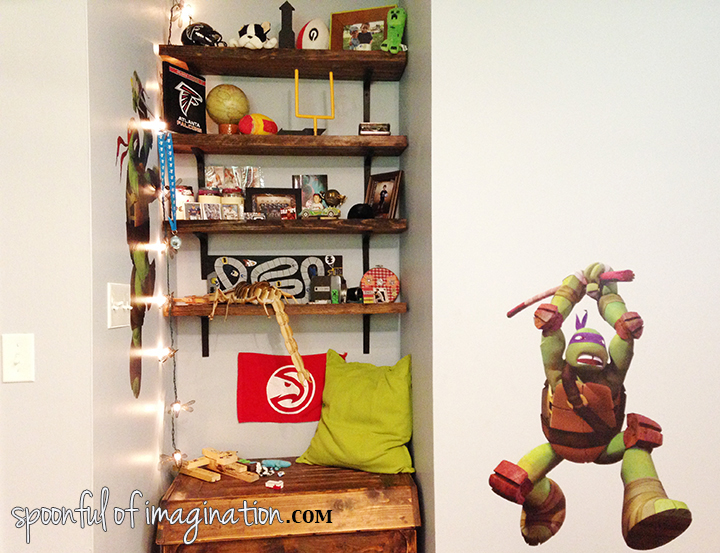
Next, the really fun part happened. The boys got to decorate their shelves. They were so excited. They would hold something and contemplate if it should go on their shelf. After placing it, they would stand back and admire. They were so excited. I literally bit my tongue as I saw my beautiful shelves get decorated….well beautifully :).

The boys were thrilled, the dressers were a little cleaner, my boys continually said how much they loved their new shelves, and I think their little hearts felt loved. That was the point, so the after picture looks perfect to me!

boy_bedroom_shelves

boy_shelf_tutorialWe do a lot of tasks for our kids as parents, I hope my kids feel us pursuing them more than anything else we do. Their little hearts, interests, memories matter most.

boy_shelvesWe have already built a lot of shelves in our time here in Indiana. You might like these as well. Click either of the pictures below to be redirected to those blog posts, if you are interested in their tutorial.

industrial_book_shelves

DIY_wood_shelfI love shelves. Can you relate!?

If you have kids or know kids, I hope you are able to go a little extra step and use your imagination and skills to help them feel loved this week. Every moment matters!

signature


Share this:

  • Click to email a link to a friend (Opens in new window)
  • Click to share on Facebook (Opens in new window)
  • Click to share on Twitter (Opens in new window)
  • Click to share on Pinterest (Opens in new window)

When it comes to decorating, go with your gut

February 14, 2015 By Erica Deuel Leave a Comment

Disclaimer: The wall decals I received for free. Thank you RoomMates for so generously gifting those to my boys. All opinions are very much my own.

One of the great joys of being a mom for me is creating special places for my kids. I literally dream about it. Taking their interests and joys to heart and using them to inspire a place that they love is so fun. This is my fourth boy bedroom to start and I have learned a few tricks that I want to share with you.

DIY_boys_bedroomIf you have been following along, you know we just moved from Georgia to Indiana at the end of last year. We have been busily making our new house…home.

The boys’ bedroom has been one of my first rooms to tackle. My inspiration board for this room is truly helping to guide this process. To give you an idea of what I started with, here is a picture of the boys’ bedroom from the first week we were in our house. Also, you can see the test paint colors on the wall in the following picture.

before_boys_bedroombefore_boy_bedroomWe have completed a chalkboard wall and a stencil accent wall. I will tell you more about that next week.

This week we checked off one more of the items on our inspiration board. We hung our Teenage Mutant Ninja Turtle RoomMates wall decals. They are amazing. The boys did them pretty much by themselves. So you know that meant re-peeling and adjusting till we got them perfect. These things are easily moveable, which is amazing.

turtle_decal

placing_wall_decalAs soon as they were hung, the boys wanted to pose with their heroes, Raphael and Donatello. They were so proud.

DIY_boy_bedroomraphael_decaldonetello_turtle_decalAs I sat watching their joy, I thought about how we are creating this space together. They are loving it as much as me. Although I wouldn’t choose it all (like the loathed posters), I am happy that they are happy with it.

Here are a few tips I have learned from creating spaces for my kids.

1. Have an inspiration board or at least a picture in your head. All too often I have bought little things here or there-thinking that I could “maybe use this somewhere/sometime”. Those little things add up and are often the first things we get rid of when we do a big sweep purge. An inspiration board helps keep you on track.

2. Collect items and don’t be afraid of it taking time to get the space right. My J spent a big portion of last summer collecting bugs, so when these little dragon-fly lights went on clearance at the end of the season, I snatched up two sets. I have been waiting months to break them open. It’s much better to buy something you LOVE than to find things you might use.

sitting_bedroom_area

3. Homemade items help turn a beautiful space into a special space. I’d much rather err on creating a special place that can be used and honors my child than a picture perfect, magazine worthy room. Embrace that feather collection, sew a handmade pillow cover, adore the handmade gift that they receive, and hang up pictures and their art. The gifts that take time show heart. A lot of these ideas are inexpensive or free too!

DIY_pillow_cover

boy_bedroom_ideas4. Go with your gut. There are times I have questioned myself. I have thought that it might seem weird or that’s not how its done in magazines, if I go with my first instinct. That moment that I hesitate is usually the point I regret. I wanted two accents walls in this room (the chalkboard wall and a stencil patterned wall), and I went for it this time. It might be unusual, but it’s so fun and we all adore it! Mix those patterns, colors, and textures to create something you love. It’s for you or your family, so if you like it…that’s all that matters.

chalkboard_wall
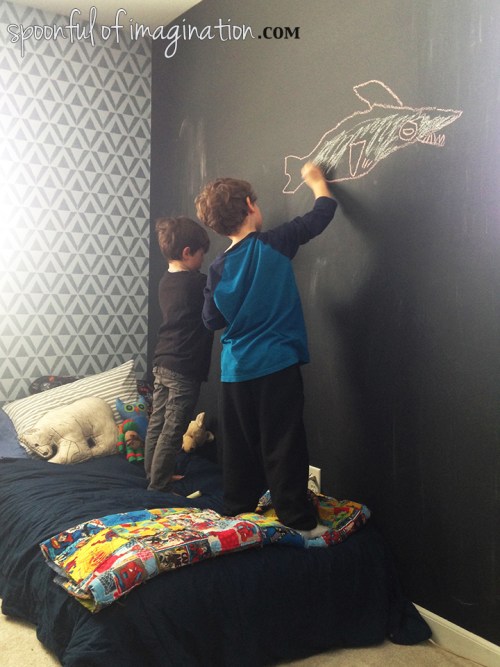
5. One more thing that I always keep in mind when creating a space, is that paint is cheap. Don’t beat yourself up over it. In the scheme of room design elements, paint is one of the cheapest to buy. I do paint samples most of the time, so I can see what the color looks like dried and in different lighting throughout the day. When it comes down to it though, I just start getting color on those walls. I can always change it, but the hardest part is just getting started.

roommate_TNMT_decalI still want to hang some of their art and a few signs I made them, but I am holding off until we get the bunk bed built. That’s the last big thing for this room. I can’t wait to get their mattresses off the floor, but they don’t seem to mind. They will miss these moments once their beds are lofted in the air.

boys_bedroom

What are your go-to tips when decorating? I still have a few more rooms to go in this house. I’d love to hear your input on how to create a space you love for less!

My hope in sharing the process of my boy’s room, you see that in creating a special space-you don’t have to spend a lot of money or have the best things. Adding a little color, imagination, time, and heart can create a place you and your kids love.

Create something this next week, it just might do your soul good.

signature


Share this:

  • Click to email a link to a friend (Opens in new window)
  • Click to share on Facebook (Opens in new window)
  • Click to share on Twitter (Opens in new window)
  • Click to share on Pinterest (Opens in new window)

DIY Transformer Necklace and Game

November 28, 2012 By Erica Deuel 12 Comments

On Saturday, my sweet Jeremiah turned four years old.  That morning I posted a picture collage which listed things he likes.  If you still want to know even more about my sweet boy, read his BIO on our “Our Family” tab at the top.  I don’t think it came as a surprise to you to see Transformers at the top of the list.  Transformers have been the “thing” around here since the end of the summer, which led Matt to making them their transformers school desk.

As his birthday approached, J kept talking about how he wanted to have a Transformers party.  The poor guy has a birthday that always falls right around Thanksgiving, if not ON Thanksgiving, so we opted to keep it small and just invite our families over for this shin dig.  Which you know my family alone is a party waiting to happen.

We took last week off school, yet with three kids in the house, we are always learning.  They assisted me in making this DIY Transformers necklace that I am going to share with you today.

We first picked out a bunch of bottle caps (and practiced counting them as we made sure we had enough for each of our party guests to have one).  The boys were sure to point out which bottle caps there were more of, so we must like that beer more and which bottle caps there were few of, so we must not like that one.  Aren’t they smart?

Next, we chose a pretty color of spray paint from our vast collection.  J liked blue the best, so we went with it for his birthday.  I spray painted the bottle caps on the backside to cover up the logos.

Waiting for these guys to dry was hard for the boys, so I let them hammer flat the “extra” bottle caps.  We will be using these on another project soon.

Those last three pictures were a rabbit trail, but all of you with active young boys like me would appreciate this news.  That activity kept them busy for an hour!  They loved it!  Boys with hammers and destroying stuff.  It was a perfect activity.  Ok, now back to the necklaces.  🙂

Once they were dry, my amazing husband helped us by using a nail and hammering a hole into each of the tops of the bottle caps.

I then printed really small pictures of Autobots off the computer.  The boys spent a long time with me looking at images and telling me which ones were good and which were not.  We had to talk about “pixels” and other new terms with this part of the project.  It was really fun to have them involved and excited.

It took some perfecting and printing of different sizes to find the size that could be cut close enough into a circle with seeing the image as big as it could be.

Once all our bottle caps had an images, we threaded them with a cord or string.  We used whatever we had.  Once there was a string (that would allow the Transformer “charm” to go around our necks) we glued the images on top.  By doing the thread and gluing of the image in this order, we got a bigger image and covered up the hole, so our “charm” would not move around on the string.  It made it a more permanent piece, which is what I wanted.

I then painted the images with a thick coat of mod podge to make them shiny.  Once they were dry, they were all done!

We laid them out, and the boys loved giving all our guests one as they arrived for J’s party.

They were SO cheap to make.  If you are not into collecting your own bottle caps, you can order brand new ones online. Just Google “Bottle Caps” and you should find plenty of options for less than $5!  I hope you will give these a try for your Transformer fan!  You could also branch out and turn these into fun charms for a number of occasions. Replace the Transformer images with your favorite characters, names, or symbols. You could use your guest’s names and hang them on seats for assigned seating or a drape them around a wine glass stem to keep track of glasses. As always, the possibilities are endless!

One other thing you might enjoy for a Transformer themed party is a quick game!

My son, Caleb, cut out a bunch of Decepticon (the bad guys) logos for me.

We taped them up all over our little house.  They were on walls, lights, beds, and even people.  Thank you Sam for being an incredible sport with your Decepticon label!  I then gave out all our Nerf guns and told them to run through the house and shoot all the Decepticons.  The boys, and a few other party members, had a blast!  It was so fun!

See everyone wearing their necklaces?!  They were all such great sports in honoring my little boy.  He felt so loved and had the best day!  I can’t believe he’s four!!  I hope you enjoyed these Transformer fun DIY party ideas.  I’d love to know if you give them a try!  Do you have a Transformer lover in your family too??

Check back tomorrow for more pictures from this party and from Thanksgiving!

Linked up at:  Uncommon Designs, DIY Showoff, Setting for Four, Red Head Can Decorate, Song Bird Blog, Miss Information

Share this:

  • Click to email a link to a friend (Opens in new window)
  • Click to share on Facebook (Opens in new window)
  • Click to share on Twitter (Opens in new window)
  • Click to share on Pinterest (Opens in new window)

Where The Wild Things Are

July 20, 2012 By Erica Deuel 3 Comments

Did you grow up loving the book “Where The Wild Things Are”?  I did not.  I didn’t get it.  To me , it was just a lot of pictures of monsters.  Now that I am a mom, I adore the book!  I love the imagination and can relate as I see my boys create places and pretend daily!  I tell my boys “I’ll eat you up-I love you so”  all the time now.  It’s a daily quote used around here.  In honor of this book and our love for it, I thought I’d paint another famous line.

“Let the Wild Rumpus Start!” is a line I often think of when I think of my little family.  Having a five, three, and one year old makes life a little crazy!  You know life with young kids normally is crazy, but it is so so good too!  I want to embrace our craziness because to me it means we are so so blessed!  I can’t imagine life without my three kids.  Yes, I might get to craft or blog more, but my life would be nowhere near as rich and rewarding.  I love my life, so I choose to say “bring on the crazy” which is what “let the wild rumpus start” means to me.

I started this little sign with an old piece of tongue and groove wood, and you know I love old wood!  I then stenciled my words on with the technique I showed you on my burlap sign.

I probably worked on this sign for 1-2 hours everyday this week to complete it.  My five-year old sat right next to me during most of my painting spells.  Thanks to him there is actually a picture of me here crafting. 🙂

Isn’t he a cute little sidekick?!  One day he painted this big rock.

Another day he wanted to paint the same picture as me 🙂

After I got the words down, I added the trees.

I dream of having an art studio with a huge gorgeous room decorated right off of pinterest.  There is just not a place for that in our little 60+ year old ranch house, so for now…this is where I created this piece.

It works though.  Until I get that studio/craft room, I will just enjoy the creative spot I have!  I slowly added monsters, until I had one on each of my trees!

I was getting close to being finished!  I love to create and craft, but I get “tired” of doing one thing for too long.  Haha! That’s probably why I do a little of it all!!  I can’t master one piece in my store like I wish I could.  I love to make and try new things.  After five days of painting this thing, I was excited for it to be done.  Although I LOVE love painting…and paint bottles and paint brushes.  They just make me feel like creating.  Do you have materials that you just love like this?

I painted some leaves on my trees and outlined them with a small sharpie, and my sign was done!  I love the finished product!

I’m not exactly sure where we will put this sign.  Maybe close to my kids art wall (that’s not yet complete), or above our engagement pictures.

It is not exact, but you can see the picture I was going for and used to model my design.  That fourth monster was the hardest to paint.  I mean, he’s like two colors yet shows contrast and depth!

I hope you enjoyed seeing my sign as the project for my Friday Project Spotlight this week!!  Thank you so much for checking in!  If you haven’t entered my hair bow giveaway yet-be sure to!

This weekend I am heading north to Farmersville, Ohio to help my grandparents auction off their big log/loft house and acreage.  They are down sizing into a retirement neighborhood where the houses are small and they get their grass cut for them.  It makes sense for an older couple, but this place has so many childhood memories for me!  It’s an amazing house that I grew up loving to go to.  I am sad to see it go, but I am also excited to see an auction!  I have never been to one!  I will post about it when I get back!

I hope you have a great weekend!

Let’s Party at One Creative Mommy,

At The Picket Fence,

I Heart Nap Time,

Stuff and Nonsense,

Romantic Home.

Share this:

  • Click to email a link to a friend (Opens in new window)
  • Click to share on Facebook (Opens in new window)
  • Click to share on Twitter (Opens in new window)
  • Click to share on Pinterest (Opens in new window)
Next Page »
  • Email
  • Facebook
  • Instagram
  • Pinterest
  • YouTube
YouTube-Channel
Erica Deuel

Subscribe for Weekly Updates!


Most Popular Posts

Recycled Old Dresser Makeover

Categories

  • All About the Kids
  • art journal
  • Blogging
  • Christmas
  • Craft Projects
  • Dancing Zebras
  • DIY
  • Eddy's postcards
  • Embroidery Journal
  • Family
  • Featured
  • Fireside Chat
  • Foster Care
  • Giveaways
  • Guest Posts
  • Home
  • Homeschooling
  • Kid Activities
  • Kid Craft
  • My Heart
  • Our Outings
  • Project Spotlight
  • Send Out Love
  • Shop
  • Sponsored Posts
  • Spoonful Lab
  • Spoonful Tribe
  • Tips + Tricks
  • Traveling
  • Uncategorized
  • Vlog

Favorite Categories

Subscribe for Weekly Updates!

Favorite Categories

© 2025 Spoonful of Imagination, Inc.