Disclaimer: The wall stencil I received for free. Thank you Royal Design Studio Stencils for so generously gifting it to me. All opinions are very much my own.
 Painting is therapeutic to me, but I usually do have to do a big build up to start a room. There is something about just getting over that hurdle that is hard for me. I often joke with Matt that I would pay someone to tape off the room and prep it for me. I don’t mind the actual painting, but the prep work is what takes more time and is harder for me. I’m messy, so I have to tape and lay a little paper. Otherwise I’m scrubbing carpet like crazy. I’ve done that in two rooms so far in this house :). Whoops!
The painting is fun because you see a transformation right before you. To watch a space be dull and dead and come to life is so cool. It’s a high that makes me want to do it again and again. When we bought this house, I said I loved the paint color and would probably only paint the kids rooms. Now, I have painted three rooms and want to keep going.
With painting, I love a good stencil project. I have used stencils for years. I love making signs with them and painting small pieces of furniture like stools or a desk. I have even used them on clothing. There is something so fun about being creative yet having something to guide you and help pull off the project. I have never been super confident in painting font, so stencils have just made life easier to pull off ideas in my head. I love them.
I don’t know why when I dreamed up my boys bedroom then I started with researching wall paper. I looked for a long time to find a fun stripe, design, shape, etc. Everything I found (that I loved) was so expensive for this size wall. I finally had to scratch that idea and resorted to looking for a stencil.
Now, obviously stencils were not a new thing to me, yet I was terrified. Placing a stencil on a little piece of wood is one thing. Trying to continue that idea over such a large space-without going slanted and making sure it all looked uniform? That stressed me out, but I wanted to give it a try. We have to try new things and be brave to ever grow, right!? So, I went for it. I found this Asmir Triangle Wall Stencil on Royal Design Studio and loved it immediately. They have so many stunning, beautiful stencils, so if you when you think of stenciled walls you think of fruit on your childhood kitchen walls, you must check out the gorgeous options Royal Design Studio Stencils has to offer.
To give you a quick reminder, this was the previous owners office, so it was a gray/beige color.
 When my stencil arrived, I was impressed with the awesome directions it came with. They gave tips on how to stencil, which end was the top of it, and what pieces of the stencil were your connection pieces to build on when you have to move it. The directions broke it down for me, so literally my fear started to melt. They were great.
 I got that stencil taped up and just went for it! I choose to go with a stippling effect that is much like my dry brush dabbing, so my wall would look a little more rustic. This was a beauty of not going with wall paper. I could make it my own! What I learned was using a roller might have saved some time, but it might have looked more like wall paper too. I wanted it to look more stamped, so not completely filled in solid.

 My hand got so tired. It started slow because I was really cautious to exam every little insert to see if they had the same “heaviness” of paint. It got faster as I became more confident. I got the hang of how much paint to put on the brush, how much looked right in a section, how to dab in the middle and then move out the sides with lighter dabs (so there was less likely a chance of paint oozing below the stencil). It got faster. My technique was to do about three or four stencil placements, before I would take a break. Usually at that point my kids needed me and my hand could use a break. This process took a couple of days. I didn’t work non stop on it because of life and the size of my wall, but I did want to get it done quickly, so my boys could stop camping out on the living room floor.

 One thing that I learned towards the end of my project was to just make it my own. The directions were so helpful, but at the end of the day this was my wall. Well, really it is my boys wall but you know what I mean. I cut my stencil up. I hated to do so, because I knew I loved the wall before it was even done-but it helped!
You can see in that picture right above, there are slots missing on the left side where the stencil wall meets the corner. I ended up cutting my stencil in half and then even into smaller like two triangle sections. It helped to go back and fill in the areas I needed too without trying to move the big stencil and making sure it was all level.

 This wall was so worth it. I absolutely love it. My boys do too. It really has me rethinking our loft bunk bed idea. I wonder if I can convince them that twin beds are cool after the inspiration picture I showed them!? I don’t want to cover up the wall! We haven’t hung anything on it yet either. Except for my son’s beloved basketball poster. The wall inspires me, and I’m so proud I overcame a fear and tried something new. It looks great, right!? My walls are older and kind of bowed, so it’s not perfect, but you can’t tell.
 I did go back with a small acrylic paintbrush and touch it up in a few places, but other than that I wanted it to look more stamped, rustic and I think we pulled that off. The boys love playing in their room.

 Have you ever stenciled a wall? I am so glad I tried this. I am now dreaming up Reagan’s bedroom and already have a stencil picked out for it. I can’t wait to start it!
 Thank you so much for checking out my boys bedroom stenciled wall! Please feel free to share a picture from here on Pinterest and be sure to stop by Royal Design Studio and see what beautiful stencils they have to offer! You can also follow them on Facebook and Twitter to stay in touch.
I hope you are having an awesome week! Get out and try something new this week. You wont regret it!

 I love how Caleb just hungers to be near and talk to me. He will come in the room literally just to tell me something. He notices the small things and confidently gives out compliments. He has a bold aggressive spirit that just wants to succeed and do it on his own. When he pours himself into something, he is relentless and can succeed at anything. He’s so smart and self teaches himself daily. I often wonder why we ever bother doing school. Most days, he will finish my explanation of a lesson for me.
 1. Caleb is obsessed with sports. We didn’t end up finding a house with a basement, so we knew he would need a basketball hoop in his room instead. He saw one he liked at Walmart, but it would have been like the third or forth one we have had. The little plastic hoop breaks so quickly. Matt’s parents found
  I am also planning to create a little wall gallery with some of their art or things that I have already made them. We are going to hang up their
  We definitely need to hang this
  I painted this sign years ago. It’s funny I showed it on our very first blog. This
  I still like the
  I love the idea of this
  As you can see, we have lots of projects and are definitely dreaming big. Why not!? We only live once. There will be lots of love put into these projects, and I will take you on the journey with us. It will be fun to see if the final reveal has some or any of these elements.
 Do you have or know a little boy that would like this room too? Please feel free to share this post. I’d also love it, if you pinned it to one of your Pinterest boards! Inspiring others to dream big will always be one of my favorites things about this blog.
 It is funny to me that this will be the third house we do chalkboard walls, yet I have never shown you HOW I do my walls. I am obsessed with them, and I want to quickly show you how you can create one too.
 1. To prep your wall, you simply wipe it down with a damp cloth to remove any dust or grime.
 3. I then use a paint brush to cut in all the edges of my paint surface.
 Do not worry if the paint looks more navy while it is wet, It will dry a really pretty dark, soft black.
 5. Once the wall has two coats and is dry, we wait three days before we use it. Before writing on it, it is important to condition the wall by rubbing the side of a piece of chalk all over the surface and erase. This will create a layer of chalk dust that provides the best erasable surface later on. You should then wait seven days before using a damp cloth to wash the wall. This ensures the paint has fully cured for chalkboard mode.
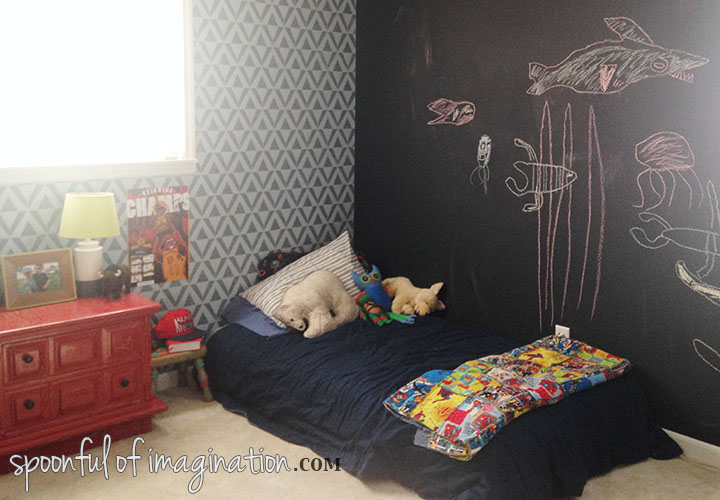
 Oh the posters… I loath them. I think I literally shrieked when my brothers gave those to Caleb for Christmas. Caleb shrieked as well but his was from delight. Those posters are not what I had planned for my boys’ room, but it is their room. I hope they have the memory growing up that their mom let them have a say in their room.

