 Do you have an artist who loves to create with friends! It’s my bet that he/she would LOVE this collaborative art party game!
Over the years our art studio was in business, we hosted hundreds of birthday parties. We found that even after the individual projects were done- the artists would want to keep creating. We always had a coloring station, magnets and play-dough available, but we quickly became known for this fun art game that we held at the end of each of our parties.
 We would play an art version of i-spy
Have you ever sat in a restaurant or a doctor’s office and needed a way to entertain kids, while they are waiting? I-spy is a classic game and one you have probably turned to in a moment like that.
Kids get into it and have fun-without even realizing you may just be making the most of some idle time. It’s fun. It forms a connection and you learn a lot about how your child thinks, what he/she notices, and enjoy each other’s company in the process.
We would create a recycled art collage to use for our art version of i-spy. If you want to learn more about how we created this collage, you can view the 5 Reasons Why Creating With Trash Matters post or this quick video lesson from Erica.
 How to play i-spy as an art game
I always demonstrated a couple of rounds of leading/playing i-spy first. The idea is you call out things you spy, and they can only be on the i-spy board. The importance is to have a creative collage that is full of different items to make a well rounded, entertaining game. A few idea categories to think through and call out as you play…
- shapes
- colors
- item’s uses
- item’s location
- funniest
After I did a few rounds, I would let any artists who wanted to think of one to call it out. If everyone was excited to call an “i-spy” item out, we would just take turns going around the table with everyone getting a chance.
We would play this for as long as kids were really interested. Want to see this game in action? I convinced two of my kids to play with me in this video, so we could demonstrate it to you! They are getting a little old for it, but once they were playing, they still had fun!

 Paint that i-spy board
When the fun in the i-spy game is winding down, you can breath new life into the game by allowing the artists to paint the board together! We always just gave out the leftover paint from individual projects and each child a brush. We tried to encourage that teamwork happens in art too. They could each start by painting what stood out to them.
It was so fun to watch the artists paint such unusual items. They’d paint in the items, on the items, around the items and get to see how the paint moves, absorbs, and takes to each item.
We use tempera paint, just in case paint gets on clothes, as hands start reaching. I promise you will know the moment the game is ready to end. You simply say, “on the count of 3, it is time to end and then brushes need to be placed down. 1-2-3 brushes down!” and then it’s time to wash hands. Your artists run off laughing and talking about the fun they just had.
 It’s not everyday that artists get to paint a bottle cap, straw or broken shell. Let alone do it with friends after talking, studying and playing i-spy with those items. This i-spy game really is the perfect collaborative art party game. From creating the i-spy board to playing with it and then painting it, you breath a lot of extra life, engineering and fun into those recycled materials.
Sometimes the birthday child would want to take his/her collage home and sometimes we would share the picture and kindly toss the piece.

Isn’t that the beautiful thing about the process being the focus of creating and playing in the arts? If the focus is to have fun, play, and learn as you go then there is no pressure to save the final product. It can just be tossed!
I hope this game inspires you to play a creative art game at your next party or artist has a slumber party. If you need a little extra encouragement, check out this 5 minute video demonstrating a game in action. Let me know, if you try this fun!

 How often do you feel tired in a project or group?
 Next, we asked our group to see what that circle could be. I didn’t want to give too many examples, because I really wanted to get their perspective on how they saw that circle. My example was to use the bottle cap as an “o” in the word “pop”.
 It was so fun to encourage the artists to just start drawing. This wood slice creation did not have to live in their homes as long as they do. We used paint markers, but you could use pens, sharpies, crayola markers or a number of other writing utensils as well!


 Every artist saw something different in that bottle cap. Even those that saw it as an “o” as well, saw it in a different word. Those that saw it as part of a flower, saw a different type or color of flower.
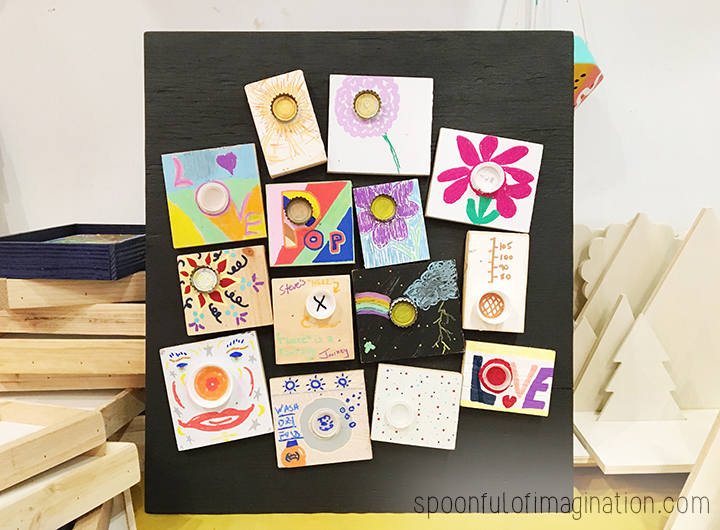 We all have different experiences and outlooks on the world. This quick little activity demonstrated that belief. We then attached all the individual projects together on one big piece of wood. I love how it shows us all coming together to make something beautiful. The collaborative piece can then hang somewhere for everyone to see and be reminded that we have something to offer as individuals that is vital to the bigger picture.
 Did you see our big news!?
 They did actually have a lot of fun. We all did.

 Caleb’s project was looking so perfect and then we came back in from playing in the snow and disaster struck! I made a huge mess and am just thankful the cameras weren’t rolling when this happened, or Matt would shown you for sure!

 If you’ve followed us for a while, you know that we encourage that the creating process is the art and not the final product. This helps to break down fears and boundaries when creating and encourage a more “go for it” spirit. This mindset will also help when your project gets messed up or isn’t looking the way you wanted it too.


 Not only was I off the hook for ruining his painting, but I was so proud of how he processed through a mistake and turned it into something he loves. He now has it hanging next to his bed! Pretty cool!
 One of my favorite things to do with my kids is to create with them. In these moments, we can sit and talk and jump from being in our own imaginations to dreaming with one another. It’s so fun. It’s often in these moments that we come up with cool ideas like this pom pom bead.
 We got a big pile of pom poms, and the next step is to just attach these two materials!
 We used our hot glue gun. We simply held the bead by the openings so the side of the bead is open. We placed a small dab of hot glue on the bead and pressed the pom pom on top.
 This is such a quick process! Before you know it, you will have a huge pile of pom pom beads! We love how the beads are cheap and quick, yet they create a whole new dimension and texture to our garland! My girl loved stringing these up with her other pieces! It was such a fun and easy sewing project for her!


 What do you think? Would your little one like to create some pom pom beads to sew with too? You could make a garland with just pom pom beads. Or maybe replace the triangle with fabric strips!? With a little imagination, the possibilities are endless.
 Christmas is coming. Can’t you see a long strand of these wrapped around a small table top tree? How cute!