 Summer is right around the corner. Can you feel it!? I know I’m aching to take homeschooling off my plate, and sit by the pool. As I tell my first grader, let’s finish strong, I am silently saying it to myself as well.
If you are like me, there are LOTS of things to look forward to this summer. For one, I hope to craft a lot and attack some projects that we have been wanting to do for a while.
I would LOVE to help kick off your summer with something for you.
 Today, we open registration for our May Spoonful Tribe craft kits. These kits will teach you how to make a fun, textured vase and three pin wheels. On top of that, with my Tablespoon and Serving Spoon kit options, I will be sending you a little gift from me. This burlap “oh, happy day” banner is a great little emellishment to hang in your home all summer longer! I hung mine on my mantel.
 The vase and pinwheels can do much more than just hold and decorate flowers. The pinwheels would make great cake toppers and the vase can hold anything you want! I love having paintbrushes in mine.
 We are constantly trying to improve and make the Spoonful Tribe the best experience for you possible. We have found that keeping it simple helps. There’s no long term commitment. No hidden costs. Pick the kit you want, we send it to you with all the supplies included. We offer three different variations of this kit, so you can pick the best price point and size that makes sense for you. All the kits include a tutorial video where I personally walk you through how to create each craft.

 Do you just want the supply list and video tutorial links? You can get that with our Teaspoon Craft Kit.
Do you want the supplies and tutorial videos to create the vase and pinwheels? You can get all this with our Tablespoon Craft Kit.
Do you want all the supplies, bonus supplies, tutorial videos, and special gift creation from me!? You can get that with our Serving Spoon Craft Kit.
There are options and we hope to help you create and imagine in an easy, FUN way! You can do these crafts! I love this little growing tribe of crafters. It is so inspiring for me to see how you take the supplies and create your own creation. Seeing your imagination come alive and your creativity in the works inspires me.
Thank you so much for all your support. If you have a friend or a “pin board” that you think would enjoy this craft, it would mean so much if you shared it!
Thank you for being the best readers ever.

 You’ll see in the shop that there are three choices –
 My second opportunity is for my local metro Atlanta readers. Or possibly a reader that needs a Spring Break Road Trip! 🙂

 So, who is ready to kick winter in the pants and bring spring in with some new creations? I know I am, and I hope that you will join me!
 It is no secret that I adore throw pillows. I love the color, texture, and simplicity that they can bring to a room.
 I would love to teach YOU two of my favorite techniques when creating a pillow. Here’s a secret there is NO sewing machine required! Can I hear a “YES!?!”

 The base material is a 20″ x 20″ white canvas pillowcase. Are you having hard time deciding on which one to choose!? They do look so cute together. You can get BOTH pillowcases with my
 We are constantly trying to improve and make this the best system for us and you. Keeping it simple helps. Our tribe membership will now be offered up in the shop. You can purchase the membership or kit that fits you and your needs best.
 Do what you love.

 I then took some fabric and cut slits in the top about an inch long and an inch apart. I then ripped the fabric along each of those slits to get about one inch strips of fabric with pretty fringe on either side.

 I put a dab of hot glue on the back of my sign and pressed one of the ends of a fabric strip into it. Once the glue had set, I started wrapping my first letter with my fabric strip. I was sure to leave some space between some wraps. I did not want it to seem perfect or polished. I liked how my mint green paint coordinated with my fabric and wanted to see some of it. You can certainly wrap yours tighter or more to cover all the letters evenly. I only added glue at the end of my first letter, but if you find your fabric is slipping-simply add a dab of glue here and there to hold it in place.

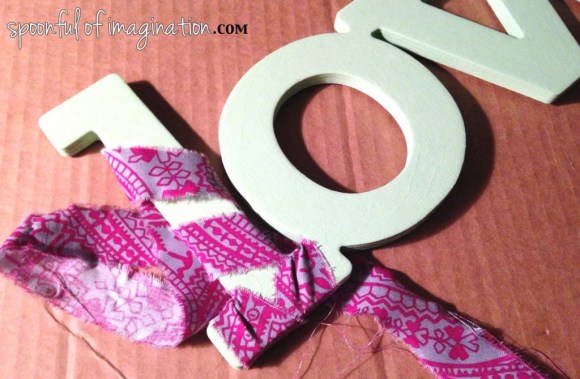 After I finished one letter, I cut my fabric strip. I simply did the same process one letter at a time. You could easily switch out your fabrics at this point too, if you wanted every letter to be something different. I decided to make all my letters the same. Just keep wrapping and doing each letter till you are done, and then find a fun place to hang your sign!

 For now, my sign is hanging in
 Do you love what you do? I pray you are living our your gifts and passions too. I feel like I have a dream job, and I am so so blessed. Creating and being with my family are two of my great loves. I would love to help make creating easier for you as well. It might not be your thing, but you can carve some “me time” and try. Yesterday, I released registration for
 Today, I am going to also give away a box! Please let the rafflecopter widget load, and then enter in as many ways as you would like for your chance to win February’s Spoonful Tribe craft kit. I will release the winner in a post next Wednesday, January 29, 2014.