 Do you have any emoji fans in your family?
We do. My daughter will often want to use my phone to text extended family and she will type one sentence but then use like 20 emojis. She will giggle as she selects each one. It’s pretty funny.
Today, we have a quick and easy craft for you to pull out for your emoji fan to enjoy! Use it as a party craft, as a life saver for a snowy day, or just for a fun weekend project. It’s low mess and sure to bring smiles!
This is how you do it…
Grab a stack of paper plates, some craft sticks and a stapler to start.  The first step is to turn one plate over on top of another and staple around the edges to attach the plates to one another.
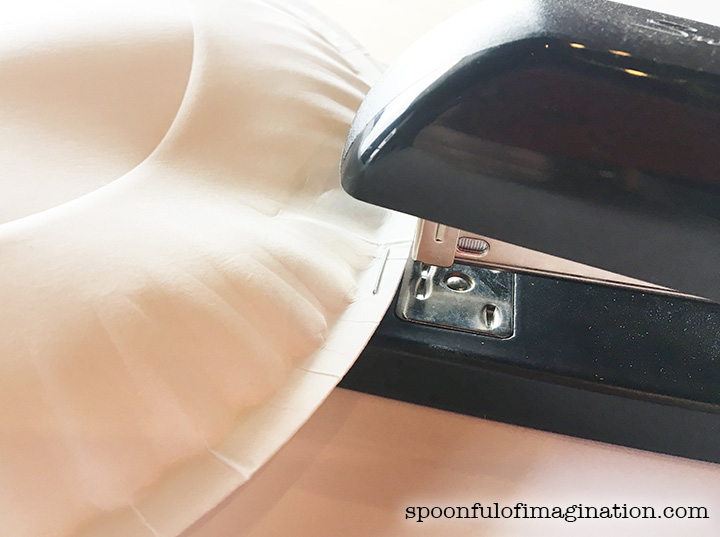
 After you have a face form, I used a little hot glue to attach my craft stick inside the plates. There was enough room between the stapled areas to stick a glob of glue on one of the plates, place a craft stick on top, and hold the sides of the plate together until the glue holds and hardens.
  After you have attached your stick, your emoji is ready to be created. This is where you can use whatever you have on hand! Markers, crayons, colored pencils, and even construction paper would be great tools to use to create your classic emoji face.
We used pastels and leftover party photo booth cut outs (minus their stick) to create our faces. We placed all the tools out on the table and watched to see what inspired our artists and which face they created. 

 It was so fun to see the artists laugh at one another’s creation as they guessed which face they were making. These were quickly used as puppets or props as kids talked and acted out little skits with them. It’s a magical moment to watch a creation turn into inspiration for more fun!
What do YOU think!? Will you make some emoji face puppets this week? This is such a simple project that you can personalize however you want! Maybe you want to paint your face-that’s great too!
Maybe you don’t have an emoji fan but you have an LOL Doll fan!? I’m sure you can take the idea of creating a face and turn it into an LOL doll. Maybe you add hair cut outs for your artists to glue on!? There are so many possibilities on how you can take this project and make it yours!
Have fun! If you create some puppets, we would love to see! Tag us on social media with #spoonfulofimagination so we can see your masterpieces!

 Do you have spring fever?
 What’s cheap? Paper can be the most inexpensive way to decorate. I saw these butterflies in the school section of my local Dollar Tree. I snatched up several bags as soon as I saw them. An idea clicked, and luckily they had the butterfly net in stock too for my idea.
 For every one of my butterflies, it took two pieces of paper. I simply folded one butterfly in half, placed a little hot glue on another butterfly down it’s center, and then pressed the folded butterfly into the glue on the fold line. Check out these pictures to see what I mean.

 That was it! I just used a little tape to put the butterflies in place on my wall.
 Are you ready for spring too!? Maybe you live more in the south and it’s already spring where you live. Have you pulled out spring decor??
 These paper butterflies were so cheap. The project could even be cheaper if you hand cut butterflies or have a die cut machine of your own. For me, I don’t have a machine and 32 butterflies for a $1 was so worth it.
 Have you ever wanted to paint a heart?
 I used some leftover spray paints and sprayed just the top of my wood pieces. I didn’t need the sides covered or for the whole top to be really even. I was just trying to cover the middle of the wood piece well. I will show you why.
 After I painted the tops, I sanded my signs a little with a heavy grit sandpaper. I wanted the color to be mixed a little with a rustic appeal. By sanding the signs a little, some of the color was removed to show the natural wood below again.
 This next step is how you get your symmetrical heart. Remember the old elementary school trick of folding a piece of paper in half? Cut one rounded half of your heart, unfold it, and ta-da… perfect heart! So, I cut a bunch of hearts out of thin cardboard. You could use construction paper or even paper bags from the grocery store. Just something that will withstand a little spray paint. The hearts were different sizes and styles. I wanted a mix of different looks, and the different hearts helped create that.
  Now, I laid a cardboard heart on each wood sign and spray painted over them with a different color. The heart cardboard acted as a sticker shadow and allowed the new spray paint color to stay off the previous spray paint layer in the shape of a heart. Since this layer of spray paint is the top layer, you do want to spray paint the sides of your heart sign now.

 My hearts were pretty perfect. I did a light sand job to rough the edges up a bit more and then the signs were complete! If you have been following me for a while, you might remember I did this painting trick on
  Do you give out Valentines? Matt and I aren’t a big Valentines Day couple, but I have created a number of different Valentines for our kids through the years. This
  Is it cold where you are? Its been in the negative degrees and snowing off and on for weeks in Indiana. We are getting crafty and creative up in here to keep these kids happy, content, and add some color to our world. Cause let’s be honest if it isn’t snowing and white outside it is gray.
 Let’s paint the sticks! I picked out some of my favorite colors and roped in one of my artists to help me out.
 My Jeremiah was eager to help. I gave him the sticks and the colors and told him to paint them however he wanted. We used acrylic craft paint and a 1″ wide brush. He did one solid and then stripes on the others. I loved the colors he paired together.
 Once he was done painting the sticks, I loved them. I loved the colors and you still caught the texture, but they didn’t seem quite finished. I wrapped some yarn around the tops of a couple, and that was exactly what they needed. I love texture and color and it’s so fun to mix contrasting elements. The sticks are rough and hard. The yarn is soft and light. They look awesome together.
 This craft was practically free! I had all the elements already on hand. What a fun, inexpensive craft to do with the kids. You could even turn your sticks into the ends of flags and tie some fabric on with your yarn. The sky is really the limit if you use your imagination!
 Do you like color too!? I always like to think my style is rustic-bohemian. I love rustic, natural elements paired with bright pops of color and patterns. What is your style? I’d love to know!
 Thanks so much for checking in and following along with my projects! If you end up painting some sticks, do please share with me! Tag me on social media with #spoonfulproject so I can see it!